Work by Category

West-Surrey-Tile-Doctor

Welcome to my Work History archive where you will find detailed examples of Tile, Grout and Stone Cleaning and Renovation work carried out through West Surrey.

To make things easier to find I have organised the posts by the most popular types of Tile and Stone. I also renovate other materials so if you’re looking for something else do get in touch as it’s highly likely we have the solution.

Popular requests include Ceramic Tile, Encaustic Cement, Fireplaces, Flagstone Pavers, Grout Cleaning, Limestone, Marble, Porcelain Tile, Quarry Tile, Sandstone, Slate, Terracotta Tile, Terrazzo Floors, Travertine, Victorian Flooring and Vinyl Floors.

Porcelain Tile Grout Colour Before After Colouring Cobham

Correcting Tilers Grout Colour Mistake in a Cobham Bathroom

This client is a famous artist who has just had a new house built inCobham. The house is stunning, and the design details have had a lot of thought put into them. As with big projects such as these there are lots of things to think about and to ensure the builders deliver your vision and artists do have an eye for detail.

A point of contention was one of the bathrooms where the tiler had used a light grey grout in the shower and a dark grey colour in the rest of the bathroom. Although an interesting contrast It looked rather odd and my client was not keen on it nor was it made clear as to why it had been grouted in that colour.

Porcelain Tiled Bathroom Before Grout Colouring Cobham

The brief was to have dark grey in the whole bathroom! As is her right after spending a lot of money, she wanted uniformity, but the tiler wasn’t having any of it. She was rather fed up with the whole situation so contacted us at Tile Doctor to ask if we could rectify the problem. In fact, this is a relatively easy job to solve so I discussed the solution and how long it would take and provided a quote for doing the work. She was happy to agree to my quote and I arranged to return the following week.

She was keen to get all the works completed and tie up all the final snags. Cobham is a very desirable area of Surrey and she will be in good company with many celebrity neighbours nearby. The high street is also full of lovely shops and restaurants, unfortunately no time for me to stop.

Grout Recolouring a Porcelain Tiled Bathroom Walls

To resolve the issue, I applied a Tile Doctor Grout Colourant in Charcoal Grey to all the wall grout in the bathroom to ensure uniformity. Tile Doctor Grout Colourant dries very quickly so once applied any excess must be removed quickly, I recommend wet wipes for this. This product is equally effective for interior or exterior applications including all types of bathrooms and kitchens and is available in ten different colours making it very versatile. It is easy to apply but ensuring the excess is removed is the key to a good finish.

Five hours of effort, one bottle of Tile Doctor Charcoal Grey Grout Colourant and three packets of wet wipes later and the job was finished. Whilst it is a simple job, it is quite time consuming and a little patience is required. However, I have to agree with the owner, the bathroom looks much more sophisticated with a darker grout colour, it’s amazing how a subtle change can make such a difference. It is worth noting when you have any tiling done, there is a variety of colours of grout available so always ask the tiler, don’t just assume there is one choice.

Porcelain Tiled Bathroom After Grout Colouring Cobham

The client was now satisfied, and the bathroom looked how she had envisaged it. I must admit, the light and dark grey combination really didn’t work! I took the opportunity to suggest she should use Tile Doctor Oxy-Pro spray for regular bathroom tile and grout cleaning as she has several tiled bathrooms in the new house, and this will ensure they remain in pristine condition.


Professional Grout Re Colouring of a Porcelain Tiled Bathroom in West Surrey

Correcting Tilers Grout Colour Mistake in a Cobham Bathroom Read More »

Damaged Victorian Hallway Fully Restored in Epsom

Damaged Victorian Tiled Hallway Fully Restored in Epsom

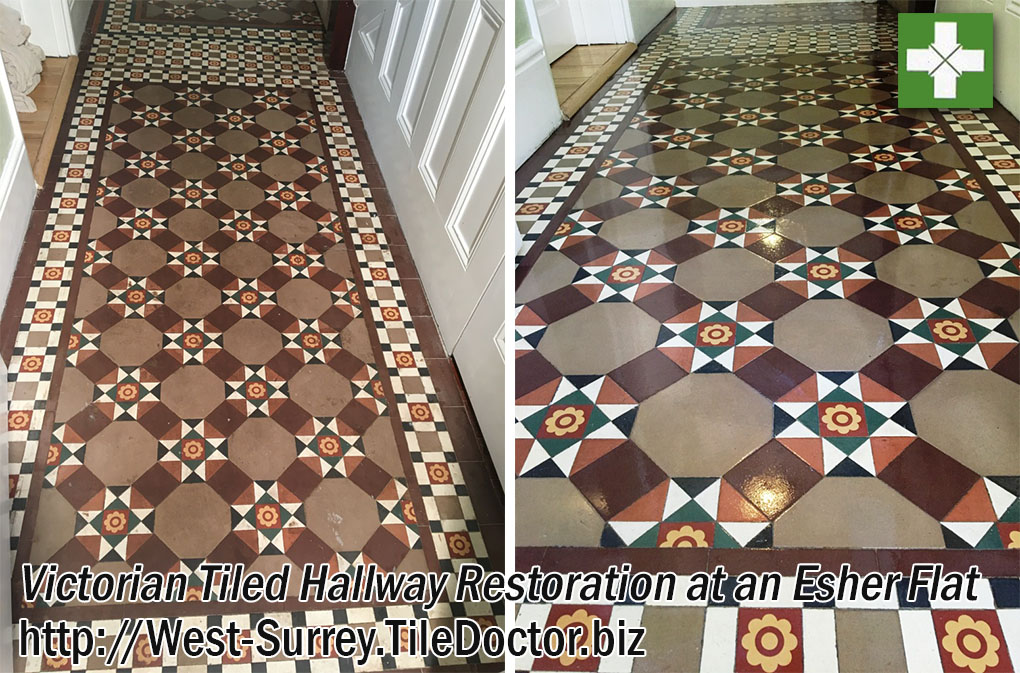
A customer from Epsom called me regarding the restoration of her Victorian tiled hallway which was previously covered in carpet and in a poor state of health. Intrigued and having spoken on the phone I agreed a time to call in and survey the floor and work out a way forward. I visited the property and could immediately see considerable repair work including resolving problems with the sub floor and tile replacement would be required and all this before cleaning and sealing.

Victorian Tiled Hallway Floor Before Rebuild in Epsom

This house had undergone some serious renovations recently and the floor was left till last. I’m not a structural engineer so was unable to advise what had happened to the floor, but all the faults appeared to run in a line from the kitchen to the front door. It was an old house so who knows what might have caused it, it might even have been bomb damage from the 2nd world war.

There were three main problem areas. The worst was by the front door where an area of about a metre square was just loose tiles and laid on rubble. The family had got used to jumping across the threshold so as not to make the problem worse. Next was a strip through the middle that was totally exposed and a massive trip hazard. The floor boards were visible as was the floor base. There was another area by the front room entrance that had some loose pattern tiles that clunked every time someone entered the room. Finally, there was a small area to the entrance to the basement that had been patched in with cement.

Victorian Tiled Hallway Floor Before Rebuild in Epsom Victorian Tiled Hallway Floor Before Rebuild in Epsom

It was clearly going to be a challenging restoration for several reasons. Had the customer kept all the loose tiles? If not, could I source matching replacements? Would it be possible to level the floor that appeared to be sloping towards the front door? Could I remove loose and broken tiles without disturbing others? Could I manage the customers high expectations?

Having worked on numerous Victorian floor restorations in the past I knew where I could potentially source replacement tiles. I also had the full backing of the Tile Doctor network so knew I could always reach out to other Tile Doctors should I face any major problems. Undaunted we agreed a date for me to return and start the work and in the mean time I would talk to several specialist tile suppliers about replacements.

Rebuilding a Victorian Tiled Hallway Floor

Before starting any tiling work, I photographed the whole floor extensively from different angles so I would have something to refer to later. Then I removed all the loose tiles placing them in buckets for further cleaning. I now had three areas that I could see beneath the floor boards and another area of cement that I broke up using a chisel drill. In total I filled six buckets with rubble and broken tiles, all of which were taken off site and disposed of at a local recycling centre.

Victorian Tiled Hallway Floor During Rebuild in Epsom Victorian Tiled Hallway Floor During Rebuild in Epsom

The next step was to ensure I had a level and flat base in the newly exposed areas on which to lay the tiles. I managed this by laying down a self-levelling compound. The compound is mixed in a bucket and poured into the holes up to the required level allowing gravity to do the levelling work for you. It is then left to dry and harden overnight.

Victorian Tiled Hallway Floor During Rebuild in Epsom Victorian Tiled Hallway Floor During Rebuild in Epsom

The next day I started by re-fixing the loose tiles in areas where the subfloor was still solid. Close packed Victorian tiles are very tough but can be brittle, often removing a single tile can cause chips or break surrounding tiles. I always buy more replicas than the job requires for this very reason. This can be very frustrating work, so I find its best approach is to remove as few tiles as possible. I explained to the customer that the floor is over 100 years old and some chips and scratches give the floor character. Perfection is an unrealistic expectation where some marks are permanent.

Part of the other renovations included the removal of two antique radiators leaving some strips of carpet and adhesive attached to the floor. I removed this using a strong mixture of tile doctor remove and go and a little encouragement from a 50-grit diamond block.

The preparation continued with the cleaning up of the three buckets of tiles recovered at the beginning of the restoration. Old adhesive and cement must be removed before refitting to ensure they can be laid flush to the adjacent tiles. Luckily for me the weather was warm and sunny, so I sat on the garden wall for the afternoon using a combination of a wet tile cutter, Fein tool and diamond blocks to get them clean while I took in the sun.

Victorian Tiled Hallway Floor During Rebuild in Epsom

The next day was spent re-laying the tiles. The tiles are in an intricate pattern and in various shapes and sizes. The main area by the front door took all day. The difference in thickness between the original and replacement tiles made the work particularly difficult. Interested neighbours came and went commenting on my progress throughout.

Victorian Tiled Hallway Floor During Rebuild in Epsom

Cleaning a Victorian Tiled Hallway Floor

The next day I soaked all the tiles with tile doctor Acid Gel and left to dwell for 30 minutes. This was to work into the porous areas and to break down years of dirt. Then attaching a very coarse 100-grit diamond encrusted pad attached to a rotary floor machine I cleaned the tiles with a dilution of Tile Doctor Pro-Clean. This process skims away a small layer of the tiles thus the dirt too. All the soil was extracted from the floor using a wet vacuum. I repeated this process twice for maximum effect. The customer was amazed at the result and I wasn’t finished yet. When wet the contrast between the white tiles and dark were astonishing, however this was temporary so I made sure the customer aware that without a sealer they would look washed out and colourless. I left the scene overnight with a couple of warm air movers in place to fully dry out the tiles.

Sealing a Victorian Tiled Floor

The tiles need to be dry before sealing so the next day my first action was to test the floor for moisture using a damp meter. They passed and were ready to take a sealer, so I discussed the different options and finishes with the customer. It was a very interesting house, full of retro artefacts so we needed something that would blend in, more importantly she had four children and a husband who bought a cycle through the house twice a day. I recommended Tile doctor seal and Go Extra. It’s super tough, offering great protection and gives a subtle sheen that I felt would suit the house. Three coats later and I was done, closing the door behind me as everyone was at school and work

Victorian Tiled Hallway Floor After Rebuild in Epsom Victorian Tiled Hallway Floor After Rebuild in Epsom

I popped back later that evening to discuss the job. The newly applied sealer had intensified the depth of colour in the Victorian tiles and returned the brightness to the floor. She was very pleased and even gave me a carrot cake to take home with me.

Victorian Tiled Hallway Floor After Rebuild in Epsom


Professional Restoration of a Victorian Tiled Hallway in West Surrey

Damaged Victorian Tiled Hallway Fully Restored in Epsom Read More »

Travertine Tiled Flooring Before and After Renovation Cobham

Dull Travertine Tiled Floor Deep Cleaned in Cobham

This client from Cobham had her kitchen and diner tiled with Travertine six years ago. With two children and three dogs living there, the sealer has gradually worn away leaving the stone exposed to dirt. The leafy village of Cobham lies in the borough of Elmbridge which is noted as being a one of the most desirable places to live in the UK. As a result, it attracts a lot of investment in property including expensive tiled floors.

I went over to survey the floor and discussed with the client how we could improve the floors appearance. The solution I proposed was to deep clean the tiles to extract all the dirt and remove what was left of the old sealer and then to re-seal the floor in order to protect it going forward. This process typically takes two days to complete; day one is spent cleaning the stone and grout, including the removal of the existing sealer and day two is spent sealing and polishing. The client was satisfied with the quotation and we arranged a time to come back and carry out the work.

Travertine Tiled Kitchen Diner Floor Before Cleaning Cobham

Cleaning a Travertine Tiled Kitchen Floor

Firstly, I asked the client to clear the floor and to help me put the dining table in the garden out of the way. Then using Tile Doctor Pro-Clean and a wire brush I cleaned the grout in the kitchen, diner and utility room. It was a large installation of Travertine, so this task took some time to complete. The floor was rinsed, and all the dirt produced was removed with a wet vacuum cleaner.

The next job was to remove what remained of the previous sealer and top layer of dirt. This was done with a rotating buffing machine with a set of diamond encrusted burnishing pads. The first one applied is a coarse 400-grit pad followed by 800 and 1500-grit, working through the pads in sequence. You might be familiar with the grit system from sandpaper, rough down to smooth. The process is lubricated with water and the slurry generated is rinsed off with water and extracted using a wet vacuum.
I left the floor to dry off overnight, they can walk on it during this time, but they needed to be careful of any spillages. The dogs were also welcomed back in from the front room.

Sealing a Travertine Tiled Kitchen Floor

The second day started with and inspection of the Travertine tile and grout looking for any areas that need further attention. I was satisfied that the floor was looking its’ best and once the preparation was complete, I applied the first coat of sealer.

On this occasion I went with Tile Doctor Ultra Seal which is doesn’t change the look of the stone giving a completely natural look. This product soaks into the pores of the stone protecting if from within and should last between three and five years depending on the amount of wear it received and how the floor is cleaned and maintained.

Two coats of sealer were applied and after each coat dried, I polished the floor using a very fine 3000-grit diamond pad. The pad is run across the Travertine dry with only a little water sprayed onto the tile using a process we call a ‘Spray Burnish’. I asked the client to keep off the travertine until it’s cured, usually for a couple of hours which is always a good excuse to go out for the evening!

Travertine Tiled Kitchen Diner Floor After Cleaning Cobham

The client was very happy the floor and they remarked it looked as good as when it was first laid. For aftercare I recommended using Tile Doctor Stone Soap which is ideal for the regular cleaning of sealed natural stone floors, many supermarket products are simply too harsh and will reduce the life of the sealer.

Travertine Tiled Kitchen Diner Floor After Cleaning Cobham


Professional Restoration of a Travertine Tiled Kitchen in West Surrey

Dull Travertine Tiled Floor Deep Cleaned in Cobham Read More »

Scratched Black Limestone Tiled Kitchen Floor Before After Renovation Godalming

New Black Limestone Floor Issues Resolved in Godalming

A property developer contacted me looking for a solution to two problems with a Black Limestone floor he had installed in the kitchen of a house in Godalming. The first problem was the sealer used didn’t do anything to enhance the look of the Limestone tiles and the new owner was very unhappy with their appearance which was now light in colour as opposed to the black Limestone he was expecting. Secondly the kitchen fitter had dragged a wooden box with a rogue screw hanging from the bottom across the floor in several places leading to scratches.

Scratched Black Limestone Floor Before Godalming

With direct trains to London Waterloo taking 45 minutes Godalming is a very desirable place to live and a property hotspot. Fortunately for the developer I was able to advise that both problems were fixable. Firstly, I had to remover the existing sealer, tackle the scratches and then re-seal and polish. Keen to have the problem resolved I was instructed to go ahead with the work.

Scratched Black Limestone Floor Before Godalming

Removing Sealer and Scratches from Black Limestone tiles

The old sealer was not doing anything to enhance the look of the Black Limestone and simply applying a new sealer on-top of the old would not have improved the appearance, so it had to be stripped off first. To remove the old sealer, I attached a coarse 400-grit Diamond burnishing pad to a floor buffer and ran it over tiles with water for lubrication. The process generates a fine slurry so once the whole floor had been burnished in this way the slurry was rinsed off with more water and then extracted using a wet vacuum.

Next, using a small handheld burnishing block I very carefully removed the scratches that the kitchen fitter had caused. Like the burnishing pads these blocks come in different grades and are encrusted with industrial diamonds.

Once happy I was happy that the scratches were gone, I continued to burnish the floor using a medium 800-grit and then a fine 1500-grit pad. These pads are used to hone the stone and build-up its polished appearance. As with the 400-grit pad water is used to lubricate the process and the floor is rinsed and extracted after each pad.

Sealing Black Limestone Tiles

I left the floor to dry off and returned after the weekend to apply the sealer. This is essential for any stone floor as otherwise dirt will become trapped in its pores making it difficult to clean effectively. Sealers can also enhance the appearance of the stone and in this case, we wanted to really bring out its natural dark colour. With this in mind I chose Tile Doctor Colour Grow which is an impregnating sealer that protects from within and includes a colour enhancing agent that improves colour and, in this case, considerably intensified the black colour of the stone to achieve the effect the customer wanted.

Scratched Black Limestone Floor After Burnishing Godalming

Before leaving I ran over the floor with a white buffing pad to add an extra lustre to the stone, by the time I had finished the floor looked amazing. Unfortunately, I never got to hear how the customer felt about the new appearance of their Black Limestone floor however the property developer was much relieved as he thought the whole floor might need to be replaced.


Professional Limestone Floor Renovation in West Surrey

New Black Limestone Floor Issues Resolved in Godalming Read More »

Red Brown Marble Tiled Floor Before After Polishing Weybridge

Red and Brown Marble Tiled Kitchen Floor Polishing Weybridge

If you have a Mable tiled floor which is not looking its best, then the transformation I achieved on this floor at a property in Weybridge will definitely be on interest. Having first spoken with the owner on the phone I went over to the house to take a better look at the floor and found that the deep red and brown Marble tiled kitchen floor was really dirty and totally lacking in colour or polish.

The floor hadn’t been professionally cleaned for some time and was now dirty and suffering from the actions of a puppy which likes to charge up and down. The Marble was also full of holes which the client explained had been getting larger. This is not usual for natural stone as it can be very sensitive to acidic cleaning products which if used constantly over time will start to dissolve the stone.

We discussed the remedies available, agreed a cost and arranged a mutually convenient time to carry the work out. I always like to do a site visit to survey the tiles and ideally run a test clean to determine the best methods for resolving the problems. This enabled me to give a more accurate quote and it also gives the customer confidence in my abilities.

Marble Tiled Floor Before Polishing Weybrige

Deep Cleaning Red and Brown Marble Kitchen Tiles

Firstly, I removed the existing sealer with a 400-grit diamond burnishing pad which is applied with water. Although this initially appears to make the floor look worse, this is only temporary, sometimes you have to make it look a little worse before it can get better! Once this was done the floor was rinsed with water to remove the slurry generated and this was then extracted off the floor with a wet vacuum.

Then for the next couple of hours I worked my way from the back door to the front filling all holes with a special expanding resin, then smoothing off as I went to ensure the smoothest of finish could be achieved. Some of the holes were indeed quite large, so there was quite a lot of work to do.

Once the filler had dried I started the polishing process using the 800 and then 1500 grit burnishing pads, once again with more water to lubricate and rinsing the floor in between polishing and removing the slurry as before. This process took much of the day, so I left the floor to dry off and came back the next day to complete the polishing and seal the Marble.

Sealing Red and Brown Marble Kitchen Tiles

The next day I returned and completed the polishing process by applying the fourth burnishing pad which is an extra fine 3000 grit pad, you apply the pad dry with only a little amount of water sprayed onto the floor in process we call a spay burnish and this final pad really brings up the polish in the Marble.

Once the polishing had finished I left the floor for a little while to make sure it was nice and dry and then I applied two coats of Tile Doctor Colour Grow sealer. This is a colour intensifying sealer that provides durable protection by impregnating the pores in the stone with sealer, so dirt cannot become ingrained there. As you can see from the pictures the sealer dramatically enhanced the natural colours in the stone.

Once dry I backed my way out of the house with a final finishing polish using a white buffing pad to remove any excess sealant and bring up the sheen of the tiles even further. I left instructions with the client to keep off for a couple of hours while the sealer cured.

The client was over the moon with the end result, the floor was left shiny, protected and looking in a fabulous condition.

Marble Tiled Floor After Polishing Weybrige


Professional Restoration of a Marble Tiled Kitchen Floor in West Surrey

Red and Brown Marble Tiled Kitchen Floor Polishing Weybridge Read More »

Slate Tiled Shower Before and After Renovation Oxshott

Removing Limescale from Slate Shower Tiles in Oxshott

In the south east of England, we suffer from hard water which as many of you have experienced can calcify on our showers leaving white limescale staining. Without fitting a water softener this limescale causes a problem around the home, particularly when the tiles are dark.

A good example of this problem was this large dark grey slate tiled shower at a house in Oxshott where the limescale had completely ruined the look of the black slate. The problem was most evident on the slate tiles on the floor but had also stained the slate split face slate tiles on the shower wall.

Slate Tiled Bathroom Before Renovation Oxshot
Oxshott is a village in Surrey between Leatherhead and Esher, a survey in 2010 by the Daily Telegraph asserted it was “the village with most footballers” in England and mentioned other celebrities who chose to live in the village probably because Chelsea Football Club have their main training ground in nearby Stoke D’Abernon; It is a beautiful area and is no surprise it is also known as ‘the most expensive village in England’.

The wet room was not that old, but due to the limescale staining was prematurely in need of attention. We often get calls from customers where they have use supermarket products to treat hard water stains, however these products are generally acidic, and this can make the problem worse. I would recommend you always read the back of the bottle before to check it is safe to use on natural stone before applying.

After inspecting the shower, I agreed with the client the best course of action, agreed a price and booked the job in for a later date.

Limescale Stained Slate Wet Room Cleaning

I returned on the agreed date and started work by first removing the existing sealer by applying Tile Doctor Remove and Go which is a multi-purpose stripper that’s formulated for use on natural stone. The product also draws out ingrained stains and removes heavy grease build-up. For best results spray the product onto the tile and then leave for it to soak in and get to work breaking down the coatings etc. After ten minutes the product is scrubbed into the stone which in this case meant by hand. The soiled solution can then be rinsed off the tiles with water. The grout was then cleaned by hand scrubbing in a strong dilution of Tile Doctor Pro-Clean followed by more rinsing.

The final part of preparation was to remove the limescale. This was done with a small handheld diamond block and a wire brush. The block is great for smoothing down all sorts of issues and being small it can get into tight areas. I then dried the whole room with an industrial blower. Slate cannot be sealed effectively when damp as it won’t cure properly. The blower is noisy but best in this situation and is very effective when a fast dry is needed.

Sealing a Slate Tiled Bathroom in Oxshott

After lunch I checked the area was nice and dry by testing the moisture content. I then sealed the whole area, wall and floor with Tile Doctor Colour Grow. Colour Grow, is a colour intensifying sealer that provides durable surface protection as well as allowing the surface to breath and enhance colour. For this project it darkened the tiles nicely and will provide protection from staining, making them much easier for the client to maintain moving forward.

The client was very happy with the lovely result. The bathroom looked clean and fresh again, now it is just a case of trying to keep on top of the limescale.

Slate Tiled Bathroom After Renovation Oxshot
 

Limescale removed from Slate Tiled Shower Wall and Floor in West Surrey

Removing Limescale from Slate Shower Tiles in Oxshott Read More »

Limestone Tiled Floor Before and After resealing Weybridge

Large Limestone Tiled Floor Stripped and Resealed in Weybridge

Weybridge is an affluent commuter town with good train connections into London Waterloo, as a result, there are some impressive houses here, many of which feature beautiful polished stone floors. This particular residence in Weybridge had a very large Limestone tiled floor installed in their Kitchen/Dinning Room, the floor had been cleaned and sealed about a year prior, so it was still in good condition however the customers ageing dog had a few accidents which had damaged the sealer.

Limestone Tiled Floor Before Cleaning in Weybridge
Urine contains Uric Acid which being an acid can damage the sealer, this is why for daily cleaning we always recommend using pH neutral cleaning product such as Tile Doctor Neutral Tile Cleaner or Stone Soap if the floor is polished. Limestone and Travertine are especially vulnerable to acids due to their high levels of calcium carbonate and often results in pock marks or small holes forming in the stone.

Resealing a Polished Limestone Floor

Once we’d moved the furniture to another room I started with a deep grout clean. I ran a dilution of Tile Doctor Pro-Clean along the grout lines then left it to dwell for five minutes while I got the wet vacuum from the van. When ready I cleaned the grout by hand with a hard nylon brush and then extracted the soiled cleaning solution with the wet vacuum.

With the grout now clean and the soil removed I set up my rotary floor cleaning machine ready to burnish the stone tile and restore the finish with a set of diamond encrusted burnishing pads.

The first pad in the set to be applied is a coarse 400 grit pad that is designed to remove existing sealers and dirt and is run over the tiles with water for lubrication. During the following hours the process was repeated with the medium 800 grit and fine 1500 grit pads which gradually polish the stone and return the shine. The floor is rinsed between each pad to remove the soil which is generated from burnishing.

This process took up much of the day so after rinsing the floor after the 1500 grit pad and extracting the soil with the wet vacuum I left the customer strict instructions not to spill anything on the unsealed floor. The tiles need to be dry before re-applying the sealer and any remaining moisture from the rinsing should evaporate overnight.

Sealing Limestone Tiles

Returning the next day, I tested the floor was dry the applied the first coat of Tile Doctor Ultra-Seal which is a natural look impregnating sealer that soaks into the pores of the stone protecting it from within. Once I’d wiped away any excess I left it to dry for half an hour before applying a second coat.

Breaking for lunch allowed sufficient time for the sealer to dry and I was able to complete the floor with a final polish.

Limestone Tiled Floor After Cleaning in Weybridge
 

Stripping and Resealing a Polished Limestone Floor in West Surrey

Large Limestone Tiled Floor Stripped and Resealed in Weybridge Read More »

Replacing White Grout With Grey in Cobham

Floor Grout Replaced in Cobham

This floor was tiled with large format beige porcelain tiles with a white grout which as you can appreciate can soon become dirty. Now you might be thinking that this post is about cleaning grout which would make sense as I’m normally asked to clean grout, however on this occasion the customer wanted it removing completely and then re-grouting in a darker colour.

Grout re-colouring grout is easily done using a Tile Doctor Grout Colourant which comes in ten different colours but in this case there was an amount of cracked and missing grout which needed replacing anyway.

Floor Grout Before Replacement Cobham
The house was in the surrey village of Cobham which dates back to Roman times and is now known for being an affluent place to live with many large houses.

Removing Grout

Removing existing grout is a messy job that can create a lot of dust so before starting work I positioned my vacuum cleaner adjacent to the tile so any dust would be extracted away. There are a number of ways to remove grout but I find the best way is to use a special oscillating tool which makes quick work of the job. Fortunately due to the large format porcelain tiles with tight grout lines I was able to completely remove all the grout within a few hours.

Grouting a

After a clean up I was ready to mix the new grey grout and start rerouting the tiles. I always use expanding grout for this as it lasts longer and won’t shrink like cheaper products which can rack as a house moves slightly. Once mixed the new grout was pushed into the grout lines with a rubber float and the excess polished off.

I managed to complete the job in a day and before leaving I have the floor a buff with a soft white pad.

Floor Grout After Replacement Cobham
The Grout tiled hallway floor now looks amazing.

Professional Grout Tiled Hallway Restoration in West Surrey

Floor Grout Replaced in Cobham Read More »

Red Wine Stains Removed From Limestone Fireplace Before and After Cleaning Woking

Red Wine Stains Removed from Limestone Fireplace in Woking

Here at Tile Doctor we have developed numerous products and techniques for dealing with all types of situations related to the cleaning of stone, tile and grout. Whilst the most popular work we do relates to the cleaning and sealing of floors sometimes we get asked to resolve more unusual issues such as this Wine Stained Limestone Fireplace at a house in the London commuter town of Woking.

Unfortunately for the customer their teenage son had knocked a glass of red wine from the dining table onto the carpet and over his parent’s adjacent limestone fireplace which despite early attention left noticeable dark spots in the stone. The customer was keen to have the stains removed and had even resigned himself to the possibility of replacing the whole fixture. Naturally this would’ve cost hundreds of pounds; fortunately, however he discovered Tile Doctor on the internet and realised the staining could be remedied reasonably easily with the correct knowledge and products.

Limestone Fireplace Before Wine Stain Removal Woking

Cleaning a Wine Stained Limestone Fireplace

I mentioned earlier Tile Doctor have developed numerous products and techniques and this includes Tile Doctor Reduxa which is designed to lift the stains out of stone, so I decided to try that first.

My method of application was to spray the stain with Reduxa and leave it to soak into the stone for about twenty seconds. Then I worked the solution into the surface of the stain lightly using a smooth 400 grit diamond block. The next step involves using a heat gun to dry out the area. This process is repeated five or six times until the stain completely disappears. The process works by dissolving the stain into the Reduxa which is then evaporated by the heat.

Limestone Fireplace After Wine Stain Removal Woking
I’m pleased to report that the stain was completely removed by the process and no other treatment was required to resolve the problem further. The customer still has to decide however what to do with the carpet…

Professional Removal of Wine Stains from Limestone in Surrey

Red Wine Stains Removed from Limestone Fireplace in Woking Read More »

Victorian Tiled Hallway Before and After Restoration in Leatherhead

Victorian Tiled Hallway Hidden Under Carpet Restored in Leatherhead

This customer who owned a lovely period residence in Leatherhead had pulled up an old hallway carpet to discover this gem of Victorian Tiled floor. The tiles were covered in carpet adhesive, paint splashes and what looked like a hundred years of dirt. I suspect the previous owners felt it was easier to cover the hallway in carpet rather than have it cleaned properly or perhaps it was just the trend at the time.

Victorian Tiled Hallway Before Restoration in Leatherhead
Given the obvious amount of work that would be needed to restore it we got a call to pop round and provide an estimate. We do a lot of Victorian floor restorations and across the Tile Doctor network I’m confident in saying there is a Tile Doctor working on a Victorian Tiled floor every day of the week.

Victorian Tiled Hallway Before Restoration in Leatherhead
The owner was happy with the quote and we agreed a date to return and restore the floor.

Cleaning a Heavily Soiled Victorian Tiled Floor

Working in a metre square area at a time, I first applied a solution of Tile Doctor Oxy-Gel and left it to dwell for twenty minutes. Oxy-Gel is a relatively new product that being in Gel form is easy to control and stays in place allowing it to dissolve dirt and in this case loosen the adhesive.

After leaving it to dwell for 20 minutes I attacked it with a very coarse 100 grit diamond pad attached to a buffer machine. This removed a minuscule layer from the surface of the tile and with it the muck. I vacuumed up the excess with a wet vacuum then rubbed down the stubborn areas with a 50 grit hand block. This removed a lot of dirt and drastically lightened the whites and blues. Finally I neutralised the floor with two rinses of clean, warm water again using the wet vacuum to remove as much moisture as possible from the floor.

I repeated this process along the length of the hallway and then inspected the floor retreating any areas containing stubborn marks.

Sealing a Victorian Tiled Floor

The hallway wasn’t that big an area so I had agreed to do the whole floor in one day. As a result I needed to force dry the floor so I could seal the tiles in the same day. I have a number of tools to do this including an industrial air mover and a heat gun which were applied for about an hour before it was dry.

To seal the tiles I applied two coats of Tile Doctor Colour Grow which as its name suggests is a colour enhancing sealer that works by impregnating the pores of the tile protecting it from within and enriching the colours in the process. This gave a lovely contrast in colour whilst providing a matt finish; another advantage of Colour Grow is it’s a fully breathable sealer which won’t trap moisture under the tile which is important for these old floors where no damp proof membrane is installed.

Victorian Tiled Hallway After Restoration in Leatherhead
The Victorian tiled hallway floor now looks amazing.

Professional Victorian Tiled Hallway Restoration in West Surrey

Victorian Tiled Hallway Hidden Under Carpet Restored in Leatherhead Read More »

Builders Clean Large Slate Floor Before and After Restoration in Farnham

Slate Tiled Floor Rejuvenated at New Barn Conversion in Farnham

Converting a barn into a property can be an exciting project, but it certainly doesn’t come without a range of challenges. If done correctly, they can look amazing and are well worth the effort.

A recent customer of mine had spent the last six months converting a barn into a residential property in the West Surrey town of Farnham. While the project had been a big success, the house had been subjected to high traffic from dozens of carpenters, electricians and builders. This had taken its toll on the newly installed Slate tiled floor – so the property owner asked me to restore it to its peak condition to complete the conversion once and for all.

Slate Tiled Floor Before Cleaning Farnham
Before accepting the job, I strongly advised the customer that I should be the last workman out of the door. In my experience few tradesmen are known to take care of other peoples work and any further work being done in the property could potentially spoil the appearance of the Slate tiles.

Slate Tiled Floor Before Cleaning Farnham

Cleaning a Slate Tiled Floor

The customer was happy for me to proceed, so on the agreed date I returned and started the work by laying down a strong dilution of Tile Doctor Pro-Clean across the floor. Pro-Clean is an alkaline-based cleaner which breaks down all manner of dirt and grime.

This was a large area of tiles, so I worked on individual sections of 3m2, first soaking the Slate in Pro-Clean and then waiting ten minutes for it to soak in and then following with a nylon black scrubbing pad fitted to a 17-inch rotary buffing machine to work the cleaning product into the stone. The tiles immediately came up looking much cleaner. Any excess water and chemical slurry was vacuumed up promptly with a wet vacuum.

The tiler had done a good job of laying the floor and removing any excess grout as normally my next step at this point would be to give the floor an acid wash, but it wasn’t necessary.

Once the tiles had been cleaned to the best of my abilities and given a thorough rinse, I left the property for 48 hours to allow any water that had seeped into the tiles to evaporate. This is important as excess moisture problems can prevent the tiles from being sealed correctly.

Sealing a Slate Tiled Floor

On returning to the property a couple of days later, I swept away any bits of dust and debris and then proceeded to seal the tiles with Tile Doctor Colour Grow.

Slate Tiled Floor After Cleaning Farnham
This impregnating, colour-intensifying sealer enhanced the stunning natural brown, gold and orange shades in the stone. Two coats of the sealer were applied to achieve a brilliant natural-look finish and robust protection against future wear and tear.
Restoring the appearance of these Slate tiles put the finishing touches on this fantastic barn conversion. Needless to say, the customer was very pleased with the results.

Slate Tiled Floor After Cleaning Farnham
 

Recently Laid Slate Tiled Floor Given Builders Clean to Restore Appearance in Surrey

Slate Tiled Floor Rejuvenated at New Barn Conversion in Farnham Read More »

Quarry Tiled Floor Before and After Restoration in Dunsfold

Quarry Tiled Floor Restored at Historic Cottage in Dunsfold

Dunsfold is a very small village in the borough of Waverley in West Surrey. It’s well known for the Dunsfold Aerodrome, an airfield that was built by the Canadian army during World War II. Hundreds of years ago, members of the English aristocracy held large estates of land in and around Dunsfold – and several historic cottages still exist in the area.

A customer of mine had recently bought one of these cottages and, during renovation work, had removed the downstairs carpets in three rooms to discover a Quarry tiled floor. Naturally, they were caked in many years’ worth of muck and carpet glue.

It would be a significant job to get the tiles in the three rooms back to looking their best – but it was a job I was more than willing to undertake. Classic Quarry tiles exude a certain rustic quality and charm – a welcome addition to many vintage properties, especially those located out in the countryside.

Quarry Tiled Floor Before Renovation at Dunsfold Cottage Quarry Tiled Floor Before Renovation at Dunsfold Cottage

Deep Cleaning a Quarry Tiled Floor

I started the restoration by soaking small areas of the floor in Tile Doctor Remove and Go. This product is excellent for removing floor coatings such as old sealers as well as shifting stubborn filth and loosening carpet adhesive deposits. After carefully scraping any excess adhesive off manually with a sharp blade, I ran my buffing machine across the floor and immediately the tiles cleaned up well.

Next, I used a 200-grit (Coarse) diamond-encrusted burnishing pad on the floor. This basically skims a layer off the tile surface, revealing the original colour of the stone that had previously been hidden underneath. A small amount of water was used as lubrication for this process. Quarry tiles are naturally very porous so after rinsing the soil off the floor I left them over the weekend to dry.

While the somewhat aggressive approach of burnishing is highly effective, it can leave the tiles looking a little washed out – and the colour slightly diminished. However, I assured the customer that the colour would return once the tiles had been sealed.

Sealing an Original Quarry Tiled Floor

While I was enjoying my weekend off, the customer fortunately found a few replacement Quarry tiles in his attic to fit around the fireplace as upstands where there were some tiles missing. So, on my return to the property my first task was to fit these replacements, before sweeping the floor clear of any debris.

To finish the restoration, I applied a couple of coats of Tile Doctor Colour Grow, an impregnating sealant which provides the matte, natural-look finish the customer wanted. This sealant penetrates into the pores of the tile, so it dries inside the stone not on the surface. It also intensifies the fantastic red shades in the Quarry.

Quarry Tiled Floor After Renovation at Dunsfold Cottage
Around an hour after the coats of Colour Grow had been applied, the floor was dry and free to be walked on, and all the furniture could be returned. Much needed life and character had been restored to the Quarry tiled floor and the new property owner was very happy as a result.

Professional Restoration of a Quarry Tiled Floor Restoration in Surrey

Quarry Tiled Floor Restored at Historic Cottage in Dunsfold Read More »

Ceramic Tiled Shower Cubicle Before and After Refresh in Oxshott

Ceramic Tiled Shower Cubicle Refreshed for new Tenants in Oxshott

When renting property out a property it makes a lot of sense to give it a quick facelift to ensure it’s more attractive to future tenants, not only will it rent faster but it should also command a better price. Many landlords don’t realise this but giving bathrooms, a facelift is the one thing you can do quite cheaply and quickly that can rapidly improve the appearance and desirability of a house, after all no-one wants to rent a place with grotty tiles!

A returning customer of mine recently contacted me about restoring the condition of a Ceramic tiled shower cubicle in a flat she owned in the Surrey village of Oxshott. She was about to rent the property out to a couple of international students, and so wanted it looking its best in all aspects.

Tiled Shower Before Renovation in Oxshot
You may be wondering why international students would want to live in Oxshott but it’s not too far at all from the University of Surrey. The town of Oxshott is quite large and has a low population density. There are many private roads in the village – and it has been named the “most expensive village in England” and so a very desirable location.

Cleaning a Ceramic Tiled Shower Cubicle

We tend to follow a tried and tested method that we have developed at Tile Doctor for restoring shower cubicles. To begin, I cleaned the grout lines using our acidic cleaning product, Tile Doctor Clean-Up. The product was scrubbed into shower wall tile and grout using a handheld rotary machine fitted with a six-inch black scrubbing pad.

Being a concentrated phosphoric acid cleaner, Grout Clean-Up effectively removes mineral deposits (salts etc) and grout smears from the tile surface to leaving it looking much fresher, it also prepares the grout for a superior bond with the grout colourant that was to be added later.

Following this, I scrubbed the tiles down with Tile Doctor Pro-Clean to provide a general clean and to remove any other muck and dirt. This was followed by a rinse with water to remove any trace of cleaning product from the tile and grout. The next step was to remove all the existing silicone mastic with a sharp knife; the mastic sealant stained with mould and much in need of replacement. Once all the rubbish was swept out, I dried any remaining dampness from the grout and tiles with a heat gun.

Grout Colouring a Ceramic Tiled Shower Cubicle

This left the grout ready to be recoloured. I did this over the course of a few hours, using a White colourant from the Tile Doctor Grout Colourant range. White is just one of ten colours available in the range and was chosen in this case to give the grout a really fresh look and to blend in with the White Ceramic tiles.

The application of Grout Colourant not only colours the grout joints – it also seals and rejuvenates them. It also dries quickly, so I could apply a second coat quite soon after the first, removing any excess as I went.

Once the restoration was finished, I resealed the shower base with fresh silicone mastic again in White to match the tile and grout. As a courtesy, I also cleaned the shower glass too, leaving an excellent result overall – and one very happy customer!

Tiled Shower After Renovation in Oxshot
 

Ceramic Tiled Shower Cubicle Cleaning and Grout Recolouring in Surrey

Ceramic Tiled Shower Cubicle Refreshed for new Tenants in Oxshott Read More »

Quarry Tiled Floor Before and After Restoration in Dunsfold

Original Quarry Tiled Hallway Given New Life in Haslemere

As the West Surrey Tile Doctor I cover quite a large area including Haslemere which is a town on the South-Western edge of the county in the borough of Waverley. I was down there to visit a customer who had recently bought an old property there and during the renovations uncovered six foot of quarry tiles by the front door. There was a patch of concrete that also needed investigating.

Quarry Tiled Floor Before Cleaning Haslemere Quarry Tiled Floor Before Cleaning Haslemere

Cleaning Hallway Quarry Tiles

I began by carefully removing the layer of concrete with a scraper and a covering of Tile Doctor Acid-Gel hoping it would expose more quarry tiles underneath. Sadly, this wasn’t the case and all I exposed was an area of ruined quarry tiles and four buried bricks. These would have to be removed then filled to bring them to the same level as the remaining tile so I could lay new tiles their place. A couple of noisy hours later following drilling and violent chisel work I’d removed enough to lay flat tiles.

I spent the next hour cleaning and preparing the remaining good tiles. After years of being covered by carpet there was a fair amount of adhesive to remove. This was loosened with Tile Doctor Remove and Go and small abrasive hand-held Diamond blocks to get into the corners.

The Remove and Go was applied to the tiles, left to soak in for ten minutes and then worked into the tile and grout with a stiff brush. The then the soiled solution was rinsed off and extracted using a wet vacuum. Following this work the tiles looked clean but worn out and colourless which is not unusual for this stage of the process and would be resolved once a sealer had been applied.

Tiles were then cut to measure then fixed in place with a rapid adhesive in line with the originals. Once they had set they were grouted in with a grout that closely matched the original. The rest of the floor was inspected at this point and any holes filled with more grout until flat. The grout and tiles were left to dry which was a good opportunity for me to eat lunch.

Sealing Original Quarry Tiles

It was only a small area so later that afternoon the tile and grout and I was able to finish the restoration with the application of two coats of sealer. On this occasion I chose to use Tile Doctor Colour Grow which is an impregnating sealer that soaks into the pores of the clay Quarry tiles protecting them from within and also enhancing the red colours in the tile.

Quarry Tiled Floor Before Cleaning Haslemere
The result was a significant improvement and the customer was very happy, leaving the following testimonial on the Tile Doctor feedback system.

“Rupert was absolutely brilliant. Very friendly and professional, worked cleanly and totally rejuvenated our quarry tile entryway. Would definitely call him again and recommend to friends.”

Professional Restoration of an Original Quarry Tiled Hallway Floor in Surrey

Original Quarry Tiled Hallway Given New Life in Haslemere Read More »

Terracotta Kitchen Tiles Given New Lease of Life in Kingston Upon Thames

Terracotta Kitchen Tiles Given New Lease of Life in Kingston Upon Thames

It’s very surprising how often I hear from home owners who are considering completely replacing tiled floors that can be easily be salvaged. While some people might believe that replacement is cheaper and quicker than cleaning, this is emphatically not true in most situations.

Thankfully, one of my recent customers, who lives in Kingston Upon Thames had been persuaded by her husband not to completely strip out the original Terracotta tiles in their kitchen. While the couple had just had new kitchen units installed, it seemed unnecessary to completely replace the Terracotta floor tiles even though they certainly needed a deep clean.

Terracotta Floor Tiles Before Cleaning Kingston on Thames
Instead, they contacted their local Tile Doctor to rejuvenated the tiles to complement the new kitchen design.

Cleaning Original Terracotta Kitchen Tiles

Before beginning, I covered all the new kitchen units with protective sheeting to prevent them from encountering water and splashes from the cleaning products. I could see that the tiles had been left unsealed for many years and this had allowed dirt and general muck to become deeply ingrained.

To clean the tiles, I applied a covering of our strong alkaline-based cleaner, known as Tile Doctor Pro-Clean, and left it dwell for a short period. I then attached a coarse, 200-grit diamond encrusted burnishing pad to my buffing machine and began working the product into the tiles. The burnishing pad milled away the dirty top layer of the tiles. Contrary to what some might believe, this doesn’t harm the tiles in any way, but instead polishes them.

Any old sealer and dirt that the buffing machine could not reach in the corners of the room was removed by hand using diamond encrusted burnishing blocks. The burnishing process does, in fact, make quite a mess, so I promptly rinsed off the resulting slurry with more water and a wet vacuum to clear the area and leave it clean and ready to be dried.

Sealing Original Terracotta Kitchen Tiles

A lot of water was used during the cleaning process, so I had to leave the property for 48 hours to let the tiles dry completely. Returning to the property after those two days, I sealed the tiles using six coats of Tile Doctor Seal and Go. Following years of next to no protection, the floor desperately needed an effective sealer to put new life in the Terracotta and Seal and Go does that in spades by adding a lovely sheen to the tile.

Terracotta Floor Tiles After Cleaning Kingston on Thames
The photo above shows the amazing difference made by cleaning the floor instead of choosing to replace. The customer’s testimonial speaks for itself:

“Excellent service and we are delighted with the work. Would definitely use Rupert again.”

Professional Tile Cleaning and Sealing for a Terracotta Tiled Kitchen in Surrey

Terracotta Kitchen Tiles Given New Lease of Life in Kingston Upon Thames Read More »

Terracotta Tiled Kitchen Before and After Cleaning in Kingston Upon Thames

Original Victorian Tiled Hallway Brought Back to Life at an Esher Flat

Esher is a small suburb in Surrey, situated just outside London. It was a fashionable area to live in amongst royalty and the aristocracy in the Victorian period, and during this time many buildings were built.

One such building has since been turned into a block of separate flats, and some of the flats still contain the original Victorian tiles in the hallway. I was contacted by one of these flat owners about restoring their tiles back to the best possible condition. Interestingly this customer’s tiles were part of a larger floor that had been divided between two flats.

Victorian Floor Tile Before Cleaning Esher

Cleaning Original Victorian Tiles

I began the restoration by spreading Tile Doctor Remove and Go across the entire set of tiles. Remove and Go is a heavy-duty stripper that helped to loosen and remove old glue deposits where carpet had been laid over the tile, it will also strip off old sealers and release ingrained muck.

The Remove and Go was worked into the tile and grout with a stiff brush and then the soiled solution rinsed off and extracted using a wet vacuum. I followed by this applying a coarse 200-grit diamond encrusted burnishing pad, fitted to a handheld buffer, to grind away the particularly stubborn dirt and stains to restore the appearance of the stone. Afterwards, I rinsed the tiles again with water and soaked up the resultant slurry with a wet vacuum.

I noticed that there remained several ingrained stains dotted across the floor, so to remove these I aggressively burnished the affected areas with a very coarse 50-grit handheld diamond block. This essentially removed the very top layer of the stone, taking with it the ingrained marks.

Next, I dried the area with a large blower and heat gun. Under normal circumstances, 48 hours needs to pass before the tiles can be sealed, but as this was a small area I was able to dry it very quickly. After carrying out a damp test, I determined the tiles were ready to be sealed.

Sealing Original Victorian Tiles

To seal the Victorian Tiles, I applied six coats of Tile Doctor Seal and Go sealer, which provides a high-quality sheen finish, as well as plenty of protection for the future. Tile Doctor have a range of suitable sealers available including Colour Grow which provides a matte finish – it’s just a matter of personal choice for the customer.

Victorian Floor Tile After Cleaning Esher
The outcome of the restoration was fantastic and the customer was very pleased, leaving the following testimonial.

“Promptly organised, delivered when promised. Good looking job when complete. Well done.”

Professional Tile Cleaning and Sealing for an Original Victorian Tiled Floor Restoration in Esher

Original Victorian Tiled Hallway Brought Back to Life at an Esher Flat Read More »

Limestone Tiled Kitchen Floor Before and After Polishing in Cobham

Polishing and Sealing a Dirty Limestone Kitchen Floor in Cobham

This customer, who lives in the small village of Cobham had the unique situation of having been abroad for six months, leaving her adult children in charge of the house. During this time, the fantastic Limestone tiled floor in the kitchen had not received adequate maintenance and its appearance had rapidly degraded. To make the situation worse, it seemed to me that the wrong products had been used on the rare occasions that it had been cleaned.

With the customer now back in the UK and living in the house again, he was keen to have the Limestone tiles restored to their original condition. He contacted me to get the job done.

Limestone Floor Tiles Cobham Before Cleaning Limestone Floor Tiles Cobham Before Cleaning

Cleaning and Polishing Dirty Limestone Kitchen Tiles

My first task was to tackle the dirty grout lines between the Limestone tiles, which were brown and stained. Tile Doctor Pro Clean, which is our reliable alkaline-based tile cleaner, was applied with a grout brush and the stains immediately vanished.

The next stage of the restoration involved polishing the Limestone using our four-pad Tile Doctor diamond-encrusted burnishing pad system. Firstly, I applied a Coarse 400 grit pad to strip away what remained of the old sealer which had been worn down in the high traffic areas of the floor. I then applied the Medium 800 grit and Fine 1500 grit pad to gradually close the pores of the stone which, in turn, restores the polished effect.

Each pad is used in combination with a small amount of water and any excess moisture is removed with a wet vacuum. To end the first day of work, I left the floor to dry and arranged to return in 48 hours to finish the job with sealing.

Sealing Limestone Kitchen Tiles

Upon my return, I ran some quick damp tests to check the floor could be sealed and quickly polished the surface again using a soft white nylon pad to remove the paw prints caused by the customer’s dog in the interim period!

Next, using a small quantity of water, I used the Very Fine 3000 grit burnishing pad to hone the stone to its highest possible quality. Once dry, I applied to the floor two coats of Ultra- Seal, which is a penetrating sealer designed to provide maximum stain protection while providing a natural look finish. One final polish later and the restoration was complete.

Limestone Floor Tiles Cobham After Cleaning Limestone Floor Tiles Cobham After Cleaning

Here’s what the customer said:

“Very professional service, very thorough, and careful with moving furniture. Very informative about the ongoing care and treatment of the flooring. Would most certainly recommend Rupert.”

Professional Tile Cleaning, Polishing and Sealing for a Dirty and Stained Limestone Kitchen Tiled Floor Restoration in Cobham

Polishing and Sealing a Dirty Limestone Kitchen Floor in Cobham Read More »

Slate Tiled Kitchen Floor Before and After Restoration in Weybridge

Repairing a Scratched Slate Tiled Kitchen floor in Weybridge

This property owner in Weybridge recently had a new fridge delivered by a well-known electrical retailer that has an unusual policy of not protecting its customers’ floors when installing heavy appliances. Predictably, the lack of care and consideration resulted in multiple unsightly scratches being left on the fantastic Slate tiled floor, mostly notably in front of the dishwasher, which was also newly installed.

Understandably, the property owner was not best pleased. He was keen to have the situation remedied as soon as possible. At Tile Doctor, we not only provide tile cleaning services but we also have the experience and equipment to hand all sorts of related issues including the restoration of scratched tiles. Happy to help. I travelled over to Weybridge to address the problem.

Scratched Slate Floor Tiles Before Cleaning Weybridge

Repairing and Sealing a Damaged Slate Tiled Kitchen Floor

The surface of the stone was damaged and the only way to repair it without the repair standing out was to strip and polish the whole floor. I therefore began the restoration by stripping the whole floor of its old sealer. The customer had marked all the deep scratches he wanted to have removed with sticky notes. I explained to him that burnishing, a type of polishing carried out using diamond encrusted handheld blocks in combination with a little water, would be perfect for this job.

The process of burnishing essentially grinds away the damaged layer and then re-polishes the stone, the process would remove the scratches and rebuild the shine. It involves the application of different grades of pads from coarse to extra fine and a little water to lubricate the process followed by a rinse with more water in-between each pad to remove the slurry generated by the process. After burnishing the floor is left polished but damp, however to save time I able to speed dry the whole floor using a powerful industrial air mover.

Once the floor was dry the final task was to re-seal the tiles. I did this using a couple of coats of Tile Doctor Colour Grow, a colour intensifying, impregnating sealer which soaks into the pores of the stone protecting it from within against ingrained dirt and stains for many years to come.

Scratched Slate Floor Tiles After Cleaning Weybridge
The customer was very satisfied with the service provided and left the following comment on the Tile Doctor feedback system:

“Great advice, open, honest and helpful. Turned up on time, explained the job well and it looks great. Very happy with the process and the finished results.”

Professional Repair of a Scratched Slate Tiled Kitchen Floor in Surrey

Repairing a Scratched Slate Tiled Kitchen floor in Weybridge Read More »

Acid-Damaged Marble Shower Cubicle Restored in Leatherhead

Acid-Damaged Marble Shower Cubicle Restored in Leatherhead

Marble tiles are a fantastic choice of stone for a shower cubicle because of its distinctive characteristics and quality. It can really add a luxurious feel and when used in a bathroom take it to the next level.

However, it’s extremely important to note that Marble like all natural stone is a porous and acid-sensitive material. It must therefore be cleaned with care using suitable products. This particular Marble tiled shower cubicle at a property in Leatherhead is a good example of this done wrong. The owner had used an acid-based cleaning product to clean the stone, resulting in damage to the sealer and causing unappealing streaks to form.

Marble Shower Wall Leatherhead Before Cleaning
This type of damage can appear irreparable but, with the right combination of cleaning methods and products, it can be fixed. Once the old sealer has been removed, and the tiles have been cleaned, polished and re-sealed, they can look as a good as new. Here’s how I helped this customer restore the Marble shower cubicle.

Cleaning and Polishing a Marble Shower Cubicle

To begin the restoration, I scrubbed the dirty grout lines using Tile Doctor Pro-Clean, which is a highly reliable and multi-purpose alkaline-based product. I then rinsed the tiles with water to remove the traces of cleaning product.

Next, I moved on to the polishing stage of the restoration – what we often refer to as burnishing. This involved the use of small six-inch diamond-encrusted burnishing pads applied with a hand buffer and with different levels of grit – ranging from Coarse to Very Fine. I started with the Coarse grit pad and worked my way sequentially through our four-pad system, polishing the stone with Medium, Fine and eventually the Very Fine pad to really bring up the polish.

Sealing a Marble Shower Cubicle

Once the shine had returned to the Marble and the damage had been removed, I re-sealed the tiles using two coats of Tile Doctor Colour Grow, a penetrating sealer designed to enhance the natural colours and patina of the stone. Once dry, I gave the tiles a final polish with a white buffing pad to put the finishing touches on the restoration.

Marble Shower Wall Leatherhead After Cleaning
The customer was thrilled with the results, saying:
“I’m really happy with the result and we will make sure we don’t use supermarket cleaners again on natural stone. Rupert was a very personable tradesman who took pride in what he was doing. He has identified Tile Doctor Neutral Tile Cleaner as being the product we should have used in the first place and has sent me the website details.”
Another satisfied customer!

Professional Restoration of a Damaged Marble Tiled Shower Cubicle in Surrey

Acid-Damaged Marble Shower Cubicle Restored in Leatherhead Read More »

White Porcelain Tiled Floor Before and After Cleaning in Windlesham

Cleaning Dirty White Porcelain Floor Tiles in Windlesham

Photographs below from a lovely house in Windlesham where I was asked to do something about the Porcelain floor tiles which had become extremely dirty and were proving impossible to clean. Infact my customer was pulling her hair out about how to fix this issue of deeply ingrained muck and was on the verge of pulling the whole lot up.

Porcelain Tiled Floor Before Cleaning Windlesham

Porcelain Tile Cleaning

Normally Porcelain tiles are fairly easy to maintain and it’s just a question of keeping the grout clean however I have to confess these tiles were perplexing indeed. In fact to be honest…I tried every product in my van to get them clean, finally settling on Oxy Gel. I left it to soak on the floor for 30 minutes and then worked it in with an aggressive 200 grit pad.

I’m happy to report the transformation was amazing, all the muck was released from the tile and I was able to extract it from the floor using a wet vacuum. My last step was to give the grout a good scrub using more Oxy Gel, rinse off with water and extract as much moisture as possible with the wet vacuum.

Porcelain Tile Sealing

I speed dried the floor with an air mover and once the floor was dry I applied a coating of Tile Doctor Ultra Seal. Now Porcelain tiles don’t usually take a sealer however these tiles were unusual in that they were trapping dirt and it’s possible they were in fact micro-porcelain so a coat of sealer was added for good measure.

Porcelain Tiled Floor After Cleaning Windlesham
My customer was really pleased with the difference and left the following comment on the Tile Doctor feedback system:

“Here’s what she said-

“Rupert was a total professional from start to finish. I was worried as to how good he would be able to make the floor – the floor consists of almost white porcelain tiles, that my tiler had failed to seal. This meant they had absorbed dirt over the last two years – even after me scrubbing the floor, they always looked dirty. The room was big – a 24 feet long kitchen/dining room. But Rupert assured me he could get it clean again – and he was as good as his word. When I saw the room for the first time, I said “I have my new kitchen back – the floor looks as good as it did the day the tiler had put the tiles down”. He left everything clean and tidy after the job – I wish I had discovered your website 18 months ago ! Thank you, Rupert, brilliant work.””

Cleaning a tiled supermarket floor in East Sussex

Cleaning Dirty White Porcelain Floor Tiles in Windlesham Read More »

Scroll to Top