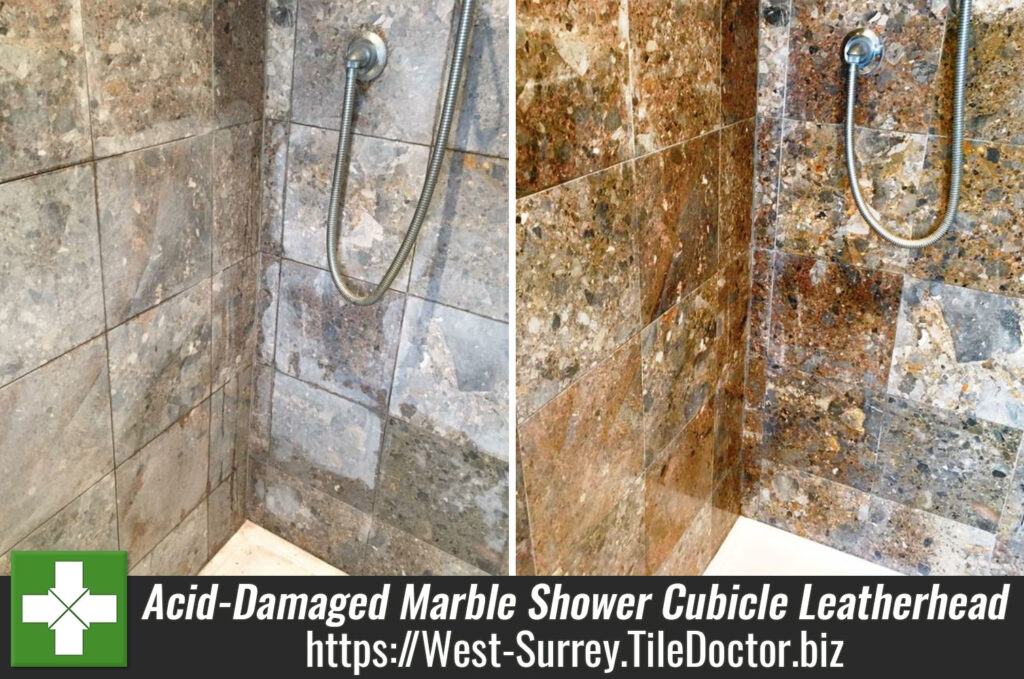

Fired Earth Limestone Floor Renovated in Godalming
This property in Godalming had the whole downstairs floor tiled with Fired Earth Limestone tiles nine years prior and had never had it cleaned or maintained professionally. The once beautiful stone was now looking dull and the grout had turned black with dirt leaving the floor looking uninviting.
This is quite normal for stone floors as it is the sealer that protects the stone from dirt and enhances its look. Most sealers wear off after three to four years sealer and in this case after nine years it was well overdue a deep clean and reseal.

I visited the property to survey the floor. It was indeed looking in need of some attention and the kitchen was particularly bad. To restore the appearance of the Limestone tile and grout the floor would need to be stripped of what remains of the old sealer, then deep cleaned with attention to the grout, polished with burnishing pads and then finally resealed. I was confident I could get it restored to a nearly new finish and to prove it I completed a small demonstration clean which the homeowner was very happy with. They agreed to my quote and we scheduled in a couple of days to carry out the work.

Cleaning a Limestone Tiled Kitchen Floor
On day one I started by cleaning the grout using a strong dilution of Tile Doctor Pro-Clean. its run along the grout line and then left to soak in for about ten minutes so it can get to work breaking down dirt and old sealer. The grout is then scrubbed using a grout brush which is then scrubbed backwards and forwards along the grout line until clean. The area is then rinsed with water and all the waste removed with a wet vacuum cleaner.
Next, I turned my attention to the Limestone tiles which needed stripping of any remaining sealer, cleaned and polished. I find the best way to do this is by apply a set of diamond encrusted Burnishing pads in sequence starting with a coarse 400-grit followed by 800, 1500 and finally finishing with an extra fine 3000 grit. Water is used to lubricate the burnishing process and the slurry is rinsed and extracted off the floor between pads. Each pad is run over the tiles three times, and it was a large floor so as you can imagine this process took most of the day.
Sealing a Limestone Tiled Kitchen Floor
I left the floor to dry out overnight and returned the next day to seal the Limestone. Before doing that, I reviewed my previous day’s work and I cleaned up any areas that needed further attention. Next step was to ensure the floor was dry as I don’t recommend applying a sealer to damp tile as you won’t get an even appearance, so before sealing a floor I tested for moisture using a damp meter.
To seal the floor, I applied two coats of Tile Doctor Ultra Seal which is an impregnating sealer that works by occupying the small pores in the stone to prevent dirt becoming ingrained there. Limestone is a light stone and most customers like that appearance so I find it best not to use a colour enhancing sealer as it can darken the stone. Ultra-Seal doesn’t contain any colour enhancer and leaves the floor with a natural finish whilst allowing the stone variations and patterns to show through.

Once the sealer was dry, I gave it a further polish with the 3000-grit pad which further brought out the natural beauty of the stone. My client was very happy with the floor, it really lifted the who area and the Kitchen in particular.

Professional Restoration of a Limestone Tiled Kitchen in West Surrey
Fired Earth Limestone Floor Renovated in Godalming Read More »