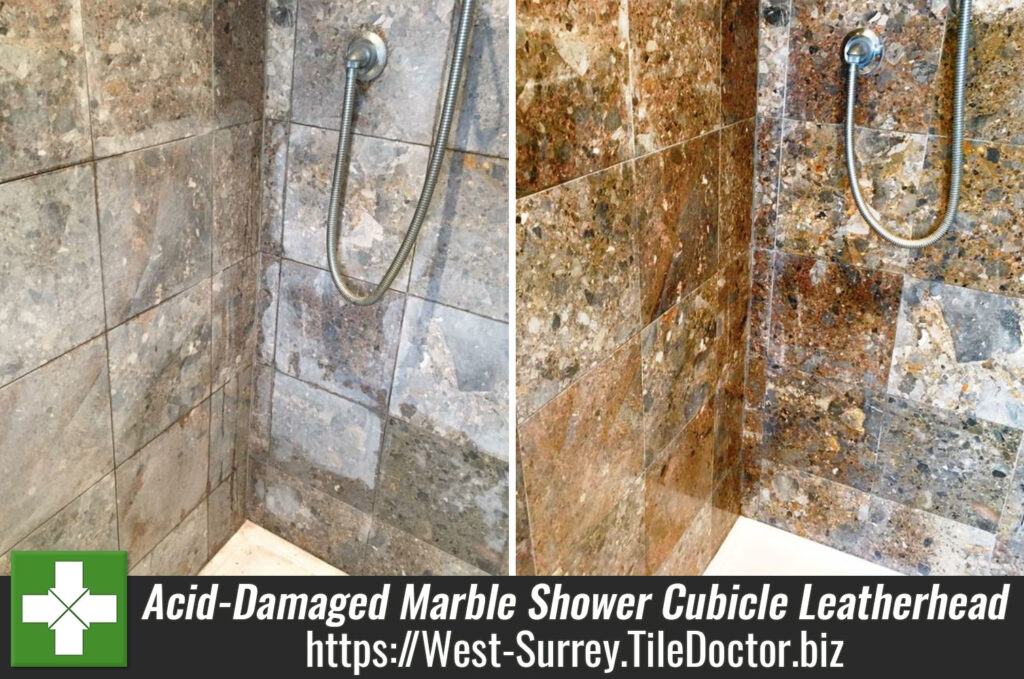
Work by Category

West-Surrey-Tile-Doctor

Welcome to my Work History archive where you will find detailed examples of Tile, Grout and Stone Cleaning and Renovation work carried out through West Surrey.

To make things easier to find I have organised the posts by the most popular types of Tile and Stone. I also renovate other materials so if you’re looking for something else do get in touch as it’s highly likely we have the solution.

Popular requests include Ceramic Tile, Encaustic Cement, Fireplaces, Flagstone Pavers, Grout Cleaning, Limestone, Marble, Porcelain Tile, Quarry Tile, Sandstone, Slate, Terracotta Tile, Terrazzo Floors, Travertine, Victorian Flooring and Vinyl Floors.

Victorian Tiled Hallway Before and After Cleaning and Sealing Weybridge

Lifeless Victorian Tiled Hallway Cleaned and Sealed in Weybridge

Details below of a tired and lifeless looking Victorian tiled hallway that I was asked to deep clean and seal at a house in the suburban town of Weybridge. The tiles were laid in a chequer pattern of Red, Yellow and Black tiles and if you look closely at the photographs you can cleanly see the ingrained dirt on the yellow tiles.

Victorian Tiled Hallway Floor Before Cleaning Weybridge Victorian Tiled Hallway Floor Before Cleaning Weybridge

Cleaning a Heavily Soiled Victorian Tiled Floor

I started the process straight away with an aggressive diamond encrusted coarse 200 grit burnishing pad fitted to a buffing machine and lubricated with water. The diamond encrusted pads really gets into the most deeply encrusted areas to remove the dirt.

Once the previous sealer and grime was removed I vacuumed up the soil using a wet vax and then gave the floor a quick blow dry with an industrial fan. For the next couple of hours, I got down to the corners to clean areas not touched by the pad. To finish I took a wire brush to any paint splash left over from recent decorating.

After further drying I was able to assess the yellow coloured tiles that would benefit from further attention. Several tiles near the heavy footfall areas benefited from a twenty-minute application of Tile Doctor Acid Gel. The gel removes mineral salt deposits and grout smears as well as breaking down deeply ingrained, long standing dirt. Once washed away and extracted using the wet vacuum I was done for the day. I warned the customer at this point that it’s common for the tiles to appear washed out in-between cleaning and sealing.

Sealing a Victorian Tiled Floor

I left the floor to dry naturally through evaporation for two days before returning to seal the floor. It’s important to ensure that the floor is bone dry before sealing as dampness can affect the sealer.

To seal the floor, I used Tile Doctor Seal and Go which gives a long lasting, tough, gloss look seal, it’s also water based so it doesn’t give off a smell as it dries like some products. Victorian tiles are quite porous so nine coats were applied, a process that took around four hours to complete.

Victorian Tiled Hallway Floor After Cleaning Weybridge
When the customer returned home from work she said the tiles looked brand new.

Professional Victorian Tiled Hallway Floor Maintenance in Surrey

Lifeless Victorian Tiled Hallway Cleaned and Sealed in Weybridge Read More »

Vinyl Kitchen and Bathroom Floor Before and After Deep Cleaning Worcester Park

Deep Cleaning Kitchen and bathroom Vinyl floors in Worcester Park

When I discuss tile cleaning with customers they normally think of the ceramic or stone tiles you find in Tile shops. Interestingly our equipment, products and techniques also work well on other hard surfaces as well including Vinyl floor tiles.

Things brings me nicely onto this customer in the London suburb of Worcester Park who had chequered Vinyl tiled floors in the bathroom and kitchen that were well overdue a deep clean.

Vinyl Kitchen and Bathroom Floor Before Deep Cleaning Worcester Park

Cleaning Heavily Soiled Vinyl Tiled Floors

I approached cleaning the Vinyl in the same way as tile by applying a strong solution of Tile Doctor Pro-Clean and leaving it soak into the floor for around ten minutes. I then scrubbed the solution into the tiles using a black scrubbing pad fitted to my 45kg buffing machine which had to be lowered down to the basement. Some houses are really difficult to get the equipment into. I like to run marathons when I’m not cleaning tiles so consider myself quite fit but this job was felt across my shoulders for days.

Vinyl Kitchen and Bathroom Floor Before Deep Cleaning Worcester Park Vinyl Kitchen and Bathroom Floor Before Deep Cleaning Worcester Park

The cleaning process released a lot of dirt from the floors which was rinsed away with water and then extracted using a wet vacuum. Once the floor was clean I was able to check the floor and repeat the process for any stubborn areas that needed extra work.

Sealing a Victorian Tiled Floor

The next step was to seal the floor however it had to be dry first so I installed an industrial blower machine to speed up the drying process. Once the floor was dry I applied a coat of Tile Doctor Seal and Go which adds a layer of protection to the Vinyl that will prevent dirt becoming ingrained.

Vinyl Kitchen and Bathroom Floor After Deep Cleaning Worcester Park Vinyl Kitchen and Bathroom Floor After Deep Cleaning Worcester Park

One cleaned and dry the dark squares contrasted well with the white which was appreciated by the customer who left the following feedback.

“Anita and I were both delighted when we got home last night and saw the results of your work – you really have brought the tiles up beautifully and the results are better than I’d hoped or expected. I hope you didn’t hurt your back too badly humping the machine up and down the stairs. We are both most grateful. Thanks again.”

Professional Vinyl Tiled Floor Restoration in South West London

Deep Cleaning Kitchen and bathroom Vinyl floors in Worcester Park Read More »

Heavily Soiled Victorian Tiled Floor Cleaned and Sealed at a Cafe in Chertsey

Heavily Soiled Victorian Tiled Floor Cleaned and Sealed at a Cafe in Chertsey

At Tile Doctor, we don’t just offer our tile cleaning and sealing services to residential properties, such as flats and houses we also cover tile installations in commercial properties, such as hotels and restaurants as well as

In fact, commercial properties tend to experience much higher daily foot traffic than residential floors resulting in much more strain on the sealer. This of course wears down the sealer more quickly and once the sealer had worn away the tiles are vulnerable to dirt becoming ingrained which makes the floor difficult to clean.

This Cafe in Chertsey is very popular with staff from the nearby hospital, as well as residents in the local area. Naturally, the cafe gets very busy and the Victorian tiled floor had experienced heavy traffic and was marked by footprints from hundreds of hungry customers.

Cafe Floor Chertsey Before Cleaning
I was called in to help the cafe owner restore this original feature back to its best possible condition and then seal again to protect it.

Cleaning a Heavily Soiled Victorian Tiled Floor

Once the cafe staff had left for the evening, I moved the tables aside to avoid damaging them and laid down a strong dilution of Tile Doctor Pro Clean across the floor. This is our reliable alkaline cleaner which is designed to loosen the dirt on tiles and grout.

As the dirt was deeply ingrained in the stone, I scrubbed the floor using an abrasive 200 grit pad fitted to on rotary buffer. Within seconds the pad had worked its magic and I had a trail of filthy water to suck up using a wet vacuum machine.

Once the majority of the floor had been cleaned, I took to my knees to closely inspect the stone for dirt. Any particularly stubborn areas were tackled using a wire brush in combination with Tile Doctor Remove and Go, which is a heavy-duty cleaner/coatings remover which works well on removing any old sealers, paints and adhesives.

Sealing a Victorian Tiled Floor

Once the floor was clean, I washed and neutralised the surface with plain water. While I was packing up for the day I also installed my air-blower to aid the drying process overnight.

Two nights later I returned to the cafe to seal the tiles with Tile Doctor Colour Grow. Colour Grow is a colour enhancing sealer that impregnates into the pores of the tile to bring out the natural colours whilst adding a durable matte finish that acts as a barrier to dirt.

Cafe Floor Chertsey After Cleaning
As you can see from the photo above, the result was fantastic. In fact, the customer loved her newly restored floor so much that she even told me to help myself to any cake of choice, I do like a bonus!

Professional Commercial Tiled Floor Restoration in Surrey

Heavily Soiled Victorian Tiled Floor Cleaned and Sealed at a Cafe in Chertsey Read More »

Severely Stained Slate Shower Cubicle Restored with Burnishing in Clapham

Severely Stained Slate Shower Cubicle Restored with Burnishing in Clapham

When used to clean natural stone, supermarket products can often cause more harm than good as this recent customer of mine discovered this the hard way!

Originally from South Africa, she had lived in a flat in Clapham for a couple of years, but had to suddenly return home earlier than expected. However, part of her flat rental agreement required her to leave the property clean and as she found it, including the fantastic Slate shower cubicle.

In a rush, the customer had attempted to clean the Slate using a popular supermarket bathroom cleaner. She left the product to sit on the base of the shower before scrubbing it in with an abrasive pan scourer.

Badly Marked Slate Shower Tray in Clapham Before Restoration
This was a big mistake – and the customer called me in a panic after discovering that her attempts had left the Slate severely stained. I travelled to the property to see what could be done to set the situation straight.

Burnishing a Severely Stained Slate Shower Cubicle

Upon observing the damage in person, I decided that the best course of action would be to use a process known as burnishing to grind away the stains. I tested a small area of the cubicle with one of our handheld diamond encrusted burnishing blocks.

Happy with the results of the test Clean, I started to burnish the whole cubicle using our system of four burnishing blocks, starting with the coarsest first and working my way down to the finest. A small amount of water was used as lubrication for each pad.

Through the burnishing process, the white stains started to disappear, exposing the lighter grey coloured Slate shower base.

Sealing a Slate Shower Cubicle

After drying the area completely with a heat gun, I was able to seal the stone with two coats of Tile Doctor Colour Grow.

This impregnating sealer not only protects the stone but also importantly it restores the natural dark shades in the Slate, enhancing its overall appearance. As an impregnating sealer, Colour Grow penetrates the pores in the stone to fill them and prevent trapped dirt.

Badly Marked Slate Shower Tray in Clapham After Restoration
To say the customer was very relieved would be a complete understatement! By hiring in professional assistance, the customer was able to resolve the situation quickly and painlessly – and more importantly hold onto her £3,000 deposit!

Professional Tile Burnishing and Sealing to Restore a Badly Stained Slate Shower Cubicle in Clapham

Severely Stained Slate Shower Cubicle Restored with Burnishing in Clapham Read More »

Ceramic Bathroom Tiles Refreshed in Chessington

Cleaning Ceramic Bath Tiles at a Chessington Student Let

This bath with shower over was located at a rental property in the town of Chessington that had been recently vacated by students. I was called in by the landlord who was looking to re-rent the property. The request was to tidy up the ceramic tiles in the shower and bath area and to make it look decent again for the next batch of soap-dodgers . We often get asked to do end of tenancy tile cleans and have seen a lot worse than this one so I was confident it could be made to look like new again.

Dirty Ceramic Bath Tiles in Chessington before cleaning
The main problem was the grout had become darkened and stained from dirt and the dyes in soaps etc., the mastic sealant between the tile and the bath also needed replacing.

Cleaning Ceramic Tiled Shower Cubicle

To get the tile and grout clean I sprayed on Tile Doctor Oxy-Gel which works better than liquid products as being gel based it sticks to the wall tile and grout and really gets to work breaking down the dirt. I left this for a few minutes before scrubbing it in and then rinsing it off with water.

Whist this was drying I started to strip out the old mastic seal and tidied up the mess that had fallen into the bathtub using a vacuum.

Grout Colouring Shower Wall Tiles

With the tiles now clean and fresh grout dried the next step was to apply a White Grout Colourant to ensure all the grout had a consistent appearance. Although time consuming the grout colourant is easily applied with a small brush and then you wipe off any excess that gets onto the tile before it dries.

I left the grout colourant to dry for 30 minutes before applying another coat and once this had dried I set about adding a new mastic seal between the wall tile and bath. I always use a high quality silicone sealant for this; I never use cheap sealant as they soon discolour and can shrink resulting in water ingress problems.

Dirty Ceramic Bath Tiles in Chessington after cleaning
It takes a little time but the bathroom now looks much fresher and ready for the next tenants.

Stained Ceramic Tiled Bathroom Tiles Refreshed in West Surrey

Cleaning Ceramic Bath Tiles at a Chessington Student Let Read More »

Large Area of Limestone Tiled Flooring Burnished in Esher

Large Area of Limestone Tiled Flooring Burnished in Esher

This beautiful Limestone tiled floor was installed in the lounge of a house in the popular London commuter town of Esher. The floor was looking dull after years without a polish and the grout was dirty, there was also a crack running along a number of tiles however without matching replacements it was decided not to address that problem at this time.

Limestone Tiled Floor Before Cleaning and Polishing in Esher
Limestone is a very tough stone so to clean the tile and rebuild the polish it would need to be burnished using different grades of Diamond encrusted pads and then sealed to protect it from ingrained dirt and stains. It’s worth noting that polished stone tile does need to be regularly maintained if you want to keep up its appearance and Tile Doctor does offer this as a service.

Limestone Tiled Floor Before Cleaning and Polishing in Esher

Cleaning Limestone Tile and Grout

Before working on the tiles I decided to treat the grout to a good old fashioned scrub with a strong solution of Tile Doctor Pro-Clean and stiff grout brush. This soon got the grout clean and the soiled cleaning solution was then rinsed away with water and then extracted with a wet vacuum.

Next step was to start the burnishing process using a coarse pad which was attached to a rotary buffer and then, using a litre of water per square metre as lubrication, I cleaned and stripped away any remaining sealer.

Once I’d removed any excess residue with the wet-vacuum, I changed to the a medium grit pad, repeated the cleaning process, and again extracted the soiled residue. Finally, I completed the process once more with the fine grit pad. Once this was completed I buffed the floor with a soft white pad to clean up any dried residue, leaving it ready to be sealed.

Sealing Limestone Tiles

Two days later, once the floor was completely dry, I returned to the property to seal and polish the floor. To begin, I restored the shine to the tiles by applying the last of the four burnishing pads – the very fine grit pad.

To seal the Limestone I applied Tile Doctor Ultra Seal which is an impregnating sealer that soaks into the pores of the Limestone to provide durable protection against ingrained dirt without changing the natural look of the tile.

After an hour, the floor was ready to be buffered once again to bring up the shine and then we were done

Limestone Tiled Floor After Cleaning and Polishing in Esher
I was very pleased with the result and more importantly so did the customer who left the following feedback

“All work very professionally carried out, floors are sparkling.”

Limestone Tiled Floor After Cleaning and Polishing in Esher
 

Professional Maintenance of a Honed Limestone Floor in East Sussex

Large Area of Limestone Tiled Flooring Burnished in Esher Read More »

Acid-Damaged Slate Shower Tiles Restored with Burnishing in Churt

Acid-Damaged Slate Shower Tiles Restored with Burnishing in Churt

One problem we encounter a lot at Tile Doctor is damaged caused to natural stone tiles by unsuitable household cleaning products. This customer, who lives in the small West Surrey village of Churt, had done this by attempting to use Cilit Bang, which is an acidic product, to remove limescale from his fantastic Slate tiled shower cubicle. While the product may indeed remove Limescale, it does say on the label that it should not be used on natural stone.

Slate shower before cleaning Churt Slate shower before cleaning Churt

Putting these types of products in contact with acid-sensitive stone typically results in some sort of etching, however, I had never before seen the type of damage that had occurred on these Slate tiles. At first, I thought the damage – which appeared as a sort of white staining – might simply be damage to the sealer. But when I did a test clean to remove the sealer, it became clear that the stone had suffered from very deep staining and the only way to remove it would be to use a process we call burnishing.

Slate shower before cleaning Churt

Burnishing an Acid-Damaged Slate Tiled Shower Cubicle

The burnishing process is a type of polishing which involves the application of diamond burnishing pads in sequence. Each pad has a different level of grit, allowing for dirt and stains to be broken down before the stone is gradually polished. We typically use burnishing on Limestone, Marble, and Travertine, but it can be used on all manner of stone in the right circumstances. This being a vertical surface, I had to complete the process using smaller six-inch pads fitted to a handheld buffer.

I started by applying the 400 grit (Coarse) pad, and followed on through to the 800 grit (Medium) and 1500 grit (Fine) pads, using a small amount of water as lubrication. I then left the tiles to dry until the next day.

When I arrived back at the property, the customer remarked that the tiles looked massively improved. Nonetheless, I found I hadn’t removed all the staining possible, so decided to repeat the burnishing process once – but this time used the pads without any lubrication. Once I was satisfied with the results, it was time to seal the tiles.

Sealing a Slate Tiled Shower Cubicle

My choice of sealer was Tile Doctor Colour Grow, which impregnates the stone to block ingrained dirt and staining. As the name of the product suggests, it also enhances the dark natural shades in the Slate, giving the shower cubicle a bold, healthy and rich appearance.

Slate shower after burnishing Churt Slate shower after burnishing Churt

The customer was really pleased with the end result, which can be seen in the photographs above and below. So pleased was the customer, in fact, that he asked me to quote for the restoration of his Limestone tiled patio.

Slate shower after burnishing Churt
 

Restoring the Appearance of Black Slate Tiles in a Surrey Shower Cubicle

Acid-Damaged Slate Shower Tiles Restored with Burnishing in Churt Read More »

Cement and Lino Covered Quarry Tiles Restored in Woking

Cement and Lino Covered Quarry Tiles Restored in Woking

This customer from Woking had a Quarry tiled kitchen floor that she simply didn’t think could be restored. The floor had been unearthed after many years of being covered by a layer of levelling compound cement and then linoleum. Indeed, the situation certainly looked dire, but I carried out a successful test clean on a patch of the floor where the cement was at its thickest to show that it would be possible to conduct a full restoration. Having seen the results, the customer was more than happy for me to get the work underway.

Quarry Tiled Floor Before Restoration Woking Quarry Tiled Floor Before Restoration Woking

\

Cleaning Dirty, Cement Covered Quarry Tiles

To begin the restoration, I soaked small sections with water and Tile Doctor Remove and Go our heavy duty coatings remover. The solution was left to dwell for a short period to soften the cement, before I used the heat from a steamer in combination with a hand scraper to begin lifting away the muck. As you can probably imagine, this was an arduous and intensive process which took a full four days to fully complete.

Quarry Tiled WC Floor Before Cleaning Woking Quarry Tiled Floor After Cleaning Woking

Next, I cleaned the cement-free tiles using our high alkaline tile cleaning product Tile Doctor Pro Clean diluted 1 part cleaner with 3 parts water. This helped to eradicate the leftover muck once I had removed the bulk of the cement. I then sprayed Tile Doctor Grout Clean Up onto the grout lines and tiles to fully neutralise them and also remove any cement residue. Finally, I steamed the floor and left it for a week to dry out completely.

Sealing Quarry Kitchen Tiles

Upon my return to the property I sealed the floor with two coats of Tile Doctor Colour Grow, an impregnating sealer which really enhances the natural colours stone, and four coats of Tile Doctor Seal and Go, a topical sealer which provides a high quality sheen finish and durable protection against stains.

Quarry Tiled Floor After Restoration Woking Quarry Tiled WC Floor After Restoration Woking

The customer was over the moon with the results and left some great feedback:

“Wayne did a really superb job. It was a very tough task, hot and exhausting, but he was fantastically good-humoured throughout, and kept me really well-informed. He was 100% reliable and very good at communicating between visits. I’m absolutely thrilled with the results! Thank you Wayne and thank you Tile Doctor! Would definitely recommend, and use your services again.”

Quarry Tiled Floor Before and After Restoration Woking
 

Removing Cement Screed from Quarry Tiled Floor in Surrey

Cement and Lino Covered Quarry Tiles Restored in Woking Read More »

Cleaning Stains From a Natural Stone Fireplace Hearth in East Byfleet

Cleaning Stains From a Natural Stone Fireplace Hearth in East Byfleet

This is a follow-on post from the Travertine Kitchen floor that I wrote about recently, you may recall the customer from East Byfleetalso asked me to clean the stains from the hearth of their Natural Stone Fireplace as well.

Stone Fireplace Before Cleaning East Byfleet

Stone Fireplace Hearth Stain Removal

The fireplace was suffering from general dirt build-up as well as bad rust and oil stains. I treated the rust stains using Tile Doctor Rust Remover which is a specialist product developed by Tile Doctor especially for the removal of rust marks from stone. Then to deal with the oil stains I applied a solution of Tile Doctor Pro Clean alkaline cleaner combined 50/50 with Tile Doctor NanoTech HBU to give the solution extra strength.

While this improved the condition of the stone and removed the un-sightly stains more work was required so I continued the cleaning process with the application of a Coarse 30 grit pad fitted to my hand machine. This proved effective, so I then refined the surface further using a series of fine grit pads before sealing the fireplace with Tile Doctor Ultra Seal, another of our impregnating sealers.

Stone Fireplace After Cleaning East Byfleet
The appearances of both Travertine tiled kitchen floor and the natural stone fireplace have benefitted greatly from deep cleaning, high quality polishing, and a fresh seal. Much to the delight of my customer, they will prove much easier to keep clean I’m the future.

Stone Fireplace Before and After Cleaning East Byfleet
 

Professional Fireplace Hearth Restoration in East Byfleet

Cleaning Stains From a Natural Stone Fireplace Hearth in East Byfleet Read More »

Restoring Travertine Kitchen Tiles in East Byfleet

Restoring Travertine Kitchen Tiles in East Byfleet

This customer, who lives in East Byfleet had been experiencing difficulties in keeping her fantastic Travertine tiled kitchen floor in good condition. Over the years it had suffered from a heavy build up of dirt and oily stains, not to mentioned a number of cracks and small holes. Needless to say, the customer was keen to restore the Travertine tiles to their former glory.

Travertine Kitchen Floor Before Cleaning East Byfleet Travertine Kitchen Floor Before Cleaning East Byfleet

Restoring Travertine Tiles

To begin the restoration, I applied Tile Doctor Remove and Go across the entirety of the large tiled area. This heavy duty remover breaks down any old sealers and other coatings, leaving the area ready to cleaned or, in this case, burnished.

Burnishing is a method for cleaning and polishing certain types of high-end stone, including Travertine, Marble, and Limestone. Our burnishing system involves the application of four diamond encrusted pads of varying grits. Firstly, I applied the Coarse grit pad, which helps to break down any dirt and stains on the surface of the tiles. Then, I worked my way through the Medium, Fine, and Very Fine pads, using a little water as lubricant, to gradually refine the polish on the Travertine. It was then rinsed and left to dry.

To round off the first day of work, I filled any cracks and holes using our two-part resin system which greatly improved the look of the tile.

Travertine Kitchen Floor Cracked Tile Before and After East Byfleet

Sealing Travertine Tiles

The following day I returned to the property to seal the tiles checking first that the floor had dried. All was well so I proceeded to seal the floor using our colour intensifying impregnating sealer Tile Doctor Colour Grow. Once that was dry, I added the finishing touches by buffing the floor with a soft white buffing pad. As you can see from the photographs, the combination of a fresh seal and polish worked wonders.

Travertine Kitchen Floor After Sealing East Byfleet
We did such a good job with the floor that the customer asked if we could also improve the appearance of their natural stone fireplace which was suffering from bad rust and oil stains however I do a separate write up on that.

Cracked Travertine Kitchen Floor Fully Restored in Surrey

Restoring Travertine Kitchen Tiles in East Byfleet Read More »

Repairing and Cleaning a Checkered Victorian Tiled Hallway in West Byfleet

Repairing and Cleaning a Checkered Victorian Tiled Hallway in West Byfleet

Victorian floors are known for their intricate and interesting patterns – so when tiles are in need of replacement, sourcing ones which are consistent with original pattern can be a difficult task.

This was the case when recently I quoted for a clean and seal of a large black and white Checkered Victorian tiled hallway at a property in the town of West Byfleet, Surrey. The customer informed me they had engaged a tiler to lay black tiles in the door thresholds to match the others. I queried why the tiler was not planning to lay tiles of the same pattern to match the rest and apparently this was due to the fact that the tiler couldn’t source the appropriate tiles.

Victorian Hallway Floor West Byfleet Door Threshold Before
Having dealt with these problems before I offered to quote separately to source and install reclaimed tiles that would provide consistency with the original pattern. The customers agreed to both jobs and I arrived at the property once I had sourced the tiles required.

Victorian Hallway Floor West Byfleet Tile Installation Victorian Hallway Floor West Byfleet Tile Installation

I set about laying the new tiles straight away, with my first action being to dig out the old cement that had been used to fill the gaps in the doorways, before making sure the sub base was flat. I then proceeded to carefully lay the tiles in a matching pattern.

Victorian Hallway Floor West Byfleet Tile Installation

Cleaning a Dirty Victorian Tiled Hallway

I then moved on to cleaning the Victorian tiles, immediately noticing numerous paint and glue stains that would have be to be tacked first. To address this problem, I applied Tile Doctor NanoTech HBU (formerly known as Ultra Clean), which uses Nano-sized particles to get beneath particularly tough stains and break them down. It’s suitable for use on a wide range of unsealed and sealed tiled surfaces, particularly where heavy dirt build-up occurs.

Victorian Hallway Floor West Byfleet Before Cleaning Victorian Hallway Floor West Byfleet Before Acid Wash

The product was scrubbed into the floor and then rinsed off using a wet vacuum to extract the soiled solution. Next I gave the tiles an acid wash using Tile Doctor Grout Clean-up, this acidic cleaner is good for tackling old cement and grout haze left on the surface of the tiles and following this I gave the floor a thorough rinse and steam to remove any trace of product.

Victorian Hallway Floor West Byfleet After Cleaning

Sealing a Victorian Tiled Hallway

I left the floor to dry completely for four days. Upon my return to the property, I gave the hallway a final light clean with Tile Doctor Neutral Tile Cleaner, just to ensure that the tiles were in the possible condition possible before being sealed.

Once satisfied with the results, I applied a single coat of Tile Doctor Colour Grow to seal the tiles. This is an impregnating sealer that will provide a long-lasting protection from the inside to mitigate the effect of the heavy wear caused by the high traffic of people walking in this area. In addition, the natural colours and shades in the black and white Victorian tiles are now enhanced, thanks to the colour intensifying properties in the product.

Victorian Hallway Floor West Byfleet After Sealing
I left the floor for a couple of hours before further sealing it with four coats of Tile Doctor Seal and Go to add surface protection and to add a nice low sheen to the appearance of the Victorian tiles.

Victorian Hallway Floor West Byfleet After Sealing
The customers were very pleased with the finished results, even going so far to call later that night to thank me. They also left the following feedback on the Tile Doctor feedback system:

“Bill Bailey installed total confidence in us as customers. Completely sympathetic to our needs, with a total understanding to our requirements. Now whilst this wasn’t the cheapest quote we had, it was the most honest, which is why we decided it was the one for us. I can honestly say that Bill’s work surpassed our expectations and I would thoroughly recommend Bill Bailey to anyone who is thinking about having any tile restoration done or expert cleaning also. A very, very happy customer who will be using Bill Bailey for any tiling jobs we have in the future.”

Professional Victorian Tile Restoration in Surrey

Repairing and Cleaning a Checkered Victorian Tiled Hallway in West Byfleet Read More »

Terracotta Tiled Conservatory in Cranleigh Deep Cleaned and Sealed

Terracotta Tiled Conservatory in Cranleigh Deep Cleaned and Sealed

Cranleigh is the self-proclaimed largest village in England, sitting about 8 miles southeast of Guildford in Surrey. One of its villagers contacted me recently to see if there was anything I could do to improve the state of their Terracotta tiled conservatory. They were in the process of completely redecorating the conservatory, having just replaced the wood and glass and I was called in to restore the tiled floor back to looking its best.

Terracotta is made from clay and is quite porous ceramic, and tends to be quite porous when made into commercial or residential tiling. Just like stone it needs to be sealed to ensure the pores don’t become ingrained with dirt, following that sealers do need to be maintained as they do wear off over time.

In this case, my client had moved into the property twenty years ago, and had only ever carried out a routine mop of the floor; as a result the floor was now ingrained with dirt and had lost its colour and would require a deep clean and seal to bring it back to life.

Terracotta Conservatory Cranliegh Before Cleaning Terracotta Conservatory Cranliegh Before Cleaning

Cleaning a Terracotta tiled conservatory

To begin with, I mixed a cleaning solution consisting of one part Tile Doctor Pro Clean to one part water. This was spread evenly across the floor and let to dwell for approximately ten to fifteen minutes. The solution was then agitated with a scrubbing pad fitted to my heavy-weight rotary machine, lifting away the initial layers of muck and any remaining old sealer.

However, I noticed after giving the tiles a rinse that some of the old sealer was still prevalent in some areas. To deal with this, I applied a solvent-based sealer stripper and left it to work its magic on the affected areas. After about an hour, I added a steamer to the mix, and this allowed me to thoroughly scrub away the old seal. This was followed up by another rinse of the floor, and left it to dry.

Terracotta Conservatory Cranliegh During Cleaning

Sealing a Terracotta tiled conservatory

I returned to the house five days later to complete the restoration. My immediate task was to carry out a moisture test to make sure the floor was completely dry and therefore ready to take the new seal, this is an important step as adding a sealer to a damp floor can result in problems.

Once satisfied, I proceeded to seal the floor with five coats of Tile Doctor Colour Grow sealer. This sealer is particularly effective at providing durable surface protection from within, and contains properties which enhanced the natural auburn shades in the Terracotta tiles.

Terracotta Conservatory Cranliegh After Sealing Terracotta Conservatory Cranliegh After Sealing

I’m pleased to say that my client was overjoyed with the quick transformation of their conservatory floor. They never knew quite how vibrant the colours in the stone could be, and better still, the floor now blends in with their newly painted lemon walls.


Terracotta Conservatory Cranliegh Before and After Cleaning
 

Terracotta Tiled Conservatory Floor Refreshed in Surrey

Terracotta Tiled Conservatory in Cranleigh Deep Cleaned and Sealed Read More »

Mouldy Ceramic Tiled Shower Refreshed in Epsom Downs

Mouldy Ceramic Tiled Shower Refreshed in Epsom Downs

A customer contacted us regarding a Ceramic Tiled Shower Cubicle problem they had with their house in Epsom Downs, Surrey. All the grout and mastic had started to go black and grow mould which is quite a common problem in modern houses and our busy lifestyles and insulated homes with insufficient ventilation.

Epsom Downs Shower Cubicle MouldyGrout Epsom Downs Shower Cubicle MouldyGrout

Cleaning Ceramic Tile and Grout

We started by giving the tiles a good scrub with Tile Doctor Pro-Clean and our non-scratch scrubbing brushes, then we thoroughly scrubbed the grout with more Pro-Clean and a special grout brush designed to get right into the grout and scrub the soil out. We then went over the grout where there was any marks and residue soil with our grout brush and Tile Doctor Grout Clean-up which is a stronger product that can remove mineral deposits and even excess grout from a tile surface.

Grout Sealing

Prevention is better than the cure so the tile and grout was dried with cloths and a heat gun and then left for half an hour. We then damp tested the area to make sure it was dry and was no damp present in the grout before applying Tile Doctor Grout Seal and Go which will seal the grout making it waterproof and stop the mould coming back

Last step was to cut out all the old mastic and seal around the shower and replace it with new silicone sealer finishing the job off nicely

Epsom Downs Shower Cubicle Finished Epsom Downs Shower Cubicle Finished


Refreshing a Ceramic Tiled Shower Cubicle in Epsom

Mouldy Ceramic Tiled Shower Refreshed in Epsom Downs Read More »

16th Century Quarry Tile Restoration at the Hogs Back, Farnham

16th Century Quarry Tile Restoration at the Hogs Back, Farnham

We were contacted by a customer interested in our no obligation home survey who wanted a quotation for restoring their Quarry Tiled floor. It was an interesting property which would probably be best described as a quirky old cottage dating back to the 16th century; it was probably built to house workers from the neighbouring farm and the owner had decided to renovate the original quarry floor tiles which were in a bad way and effected by damp due to a lack of damp proof course and the tiles being laid straight onto a bed of peat. It’s quite amazing when you think that these tiles had been laid over 400 years ago and were still serviceable.

Quarry Tiles Before Cleaning Quarry Tiles Before Cleaning

Cleaning Antique Quarry Tiles

We started by steaming off all the old Sealers, Soil and Waxes that had been applied over the years, we then applied neat Tile Doctor Pro-Clean mixed 50/50 with Nano-Tech Ultra-Clean and left it dwell on the floor for twenty minutes, the two products combined create a powerful cleaning agent which is still safe to use on tile and stone. The tiles were then scrubbed using a rotary machine fitted with a black pad to work the solution into the floor and then it was left to dwell for a further twenty minutes. The dirty solution was then removed using a wet vacuum which I can highly recommend for removing liquids from floors.

The next step was to use our Tile Spinneret tool which is fed from a heavy machine fitted into our Van. Often referred to as a truck mount system the tile spinner power rinses the floor with a high pressure warm water jet wash and at the same time sucks the soiled water back to a recovery tank in our van ready for disposal.

The customer had to make a visit abroad at this point so we left the newly cleaned floor for six weeks to allow it to fully dry out fully before we came back to seal it.

Quarry Tiles After Cleaning Quarry Tiles After Cleaning

Sealing Antique Quarry Tiles

When we returned six weeks later we found a couple of areas were still showing a slight damp problem and so we dried the tiles concerned with heat guns to make sure it was bone dry. Now that the dirt had been removed from the tiles we could also see that they had lost most of their colour and so it was necessary to apply a specially formulated red tile colouring product over the whole floor which we left for an hour to soak in before using a polishing machine to make sure it was well ground in and evenly distributed across the surface of the quarry tiles. The last step was to seal the tiles to and for this we choose a product called Tile Doctor Seal and Go which I can highly recommended for sealing quarry tiles and it gives a nice low sheen effect. Six coats of sealer where needed in total which took some time to apply as you have to let the sealer dry before applying the next coat. Last step was to buff the tiles to a nice shine using our polishing machine fitted with a Buffing Pad.

Quarry Tiles Restored Quarry Tiles Restored

This restoration was a tough assignment and certainly took some time, but I think you will agree our efforts have made a significant improvement to the floor.

Quarry Tile Restoration in Farnham

16th Century Quarry Tile Restoration at the Hogs Back, Farnham Read More »

Cleaning & Grout Colouring a Marble Tiled Bathroom in Earls Court

Cleaning & Grout Colouring a Marble Tiled Bathroom in Earls Court

These Marble Tiles were installed in the bathroom at a residence in Earls Court, west London; the Marble certainly gave a luxurious effect but had dulled over time, on top of that the grout had stained in places and both were in need of really good deep clean.

Marble Tile Cleaned

Cleaning Marble Tiles

We set about cleaning the Marble Tiled floor using a mild dilution of Tile Doctor Pro-Clean worked in with Deck Brushes. Once we were happy the floor was rinsed with clean water to remove and chemical residue and we then began polishing the floor using a buffing machine fitted with a green burnishing pad, the green pads are encrusted with very fine diamonds and used with a small amount of water to produce a high shine finish.

Marble Tiles Cleaned and Polished

Applying Grout Colourant

The last step was to colour the grout which is easily done using a bottle of Grout Colourant. This is applied into the grout lines using a tooth brush; as well as changing the colour the product provides an epoxy coating on top of the grout protecting it against future discoloration.

The customer was certainly pleased with difference and said the “the results are amazing” when she returned home from work that evening.

Marble Tiles Cleaned and Polished
 

Cleaning and Polishing Marble Bathroom Tiles

Cleaning & Grout Colouring a Marble Tiled Bathroom in Earls Court Read More »

Beautiful Indian Sandstone floor deep cleaned in Guildford

Beautiful Indian Sandstone floor deep cleaned in Guildford

This beautiful Indian Sandstone tiled floor was laid throughout an open plan Kitchen, Dining and Lounge in a house in Guilford. The floor was in need of a deep clean and seal so we called round initially to survey the tile and grout and provide a quote which was accepted.

Indian Sandstone During CleaningIndian Sandstone Washing

Cleaning Indian Sandstone

To clean the floor we used a solution of Tile Doctor Pro-Clean which is a flexible strong alkaline cleaner specially designed for use on stone floors mixed 50/50 with Tile Doctor Nanotech Ultra-Clean which contains tiny abrasive particles. This solution was left to dwell on the floor for thirty minutes before being worked into the floor with scrubbing brushes. We then used a tile spinner tool and truck mount cleaning system to rinse the floor of all residue soils and chemicals, the floor was covered with dust sheets whilst it dried and also to keep it clean until we came back to seal it.

Indian Sandstone After Cleaning

Sealing Indian Sandstone

On our return we discussed the effects of different sealers, they all offer stain protection to different levels but change the appearance of the tile in different ways. The customer liked the natural look of the stone so we applied Tile Doctor Ultra-Seal using three coats of sealer to fully seal the tiled floor; Ultra-Seal is also a penetrating sealer that gets deep into the pores of the stone. The customer was delighted with the result and we have been asked to return every year to maintain the floor.

Indian Sandstone After Sealing
 

Indian Sandstone Floor Maintained in Guilford

Beautiful Indian Sandstone floor deep cleaned in Guildford Read More »

Polishing a scratched Marble Floor in Eaton Square, Belgravia, London

Polishing a scratched Marble Floor in Eaton Square, Belgravia, London

We were asked to polish this marble floor in Eaton Square which is in Belgravia one of the most historic residential parts of London, a short distance from Buckingham Palace and Knightsbridge.

Cleaning a Marble Tiled Floor

There were a lot of scratches in the Marble floor and it was also looking dull, so we set about first by giving it a good clean using Tile Doctor Pro-Clean which is an strong alkaline product designed for use on stone floors. It’s important to clean the floor before polishing to ensure there’s no dirt or grit on the floor which might get ground into the floor during polishing making the problem worse.

Marble Floor Polishing in Belgravia Marble Floor Polishing in Belgravia

Polishing Marble Tiles

Once the floor was clean we started the polishing process with a Red Burnishing pad fitted to a rotary machine, the pads are diamond encrusted and can remove deep scratches. We went over the floor carefully covering every tile four times and then followed up with the white, yellow and then green polishing pads, each one polishes the floor to a higher degree. The next step was to apply Tile Doctor Shine crystallising powder with a little water polished in with our polishing machine fitted with a natural fibre pad; this step gives the floor a tough durable finish. The floor was then thoroughly rinsed to remove any residues left on the floor all before giving it a final re-polish to bring out a deep high shine.

Marble Floor Polishing in Belgravia Marble Floor Polishing in Belgravia


Cleaning and Polishing a Marble Floor in Belgravia

Polishing a scratched Marble Floor in Eaton Square, Belgravia, London Read More »

Saltillo Tiles in Shirley

Saltillo Tiles in Shirley

Successful Restoration of Saltillo Tiles

We went and had a look at a floor in a house in Shirley recently to find a dull Saltillo Terracotta tiled floor that was in need of some Tile Doctor TLC. Saltillo tiles are typically made in a region of Mexico; they are very porous and can scuff and stain quite easily if not protected so it’s important to maintain a sealer.

Saltillo Tiles before cleaning Saltillo Tiles before cleaning

Cleaning Saltillo Tiles

We advised the customer that we would probably not be able to get the tile in the traffic lanes back to the same colour due to the excessive wear from foot traffic but we would certainly try our best. We find it best to be honest about what we can achieve and set the customer’s expectations up front. They were happy for us to continue and accepted our very reasonable quote for the amount of work involved so we about cleaning the floor. This we did using a solution of Tile Doctor Pro-Clean tile and grout cleaner. To clean the tougher areas that were heavily stained we mixed the Pro-Clean with a little Tile Doctor NanoTech Ultra-Clean which helps to enhance the cleaning power.

Saltillo Tiled Floor before cleaning

Grout Re-Colouring

We left the floor to dry for 2 days then we went back and re-coloured the customer’s grout which as you can see from the pictures made a huge difference to the look of the floor. Grout Colourant can make a old tired looking floor look totally different and when applied properly forms a barrier that protects the grout from dirt engraining into the grout.

Saltillo Tiled Floor after cleaning Saltillo Tiled Floor after cleaning

Sealing Saltillo Tiles

Terracotta tile are extremely porous and so it came as no surprise that we needed to apply nine coats of Tile Doctor Seal and Go. After the last coat we waited for fourty minutes and then buffed the floor to bring out the shine and harden the sealer, the customer was very pleased with the results and made the following comment:

Thank you very much for doing such a wonderful and professional job my wife and I are very impressed with the results.


Saltillo Tiles Restoration in Shirley

Saltillo Tiles in Shirley Read More »

Indian Orange Slate Floor in London

Indian Orange Slate Floor in London

Restoration of a client’s slate floor

We were asked to take a look at cleaning and re-sealing an Indian Orange Slate floor at a property in London, the owner had struggled to find someone who would take the job on as they were unsure what they were dealing with and so called in Tile Doctor. This isn’t surprising as we do find that many so called Tile Cleaning companies only take on straight forward cleaning jobs where they can get in and out quickly without fear of complications.

Cleaning an Indian Orange Slate Floor

The floor was in reasonable condition and had simply dulled as the sealer had worn down over time and dirt became trapped in the pores of the tile and grout.

Indian Orange Slate Floor Before Cleaning Indian Orange Slate Floor Before Cleaning

We cleaned the floor using a strong dilution of Tile Doctor Pro-Clean Tile and Grout cleaner in conjunction with a scrubbing machine fitted with a black pad. This removed the old sealers and was followed with a thorough deep clean using our powerful truck mount high pressure cleaning machine to remove any residue soils and sealers etc.

Sealing an Indian Orange Slate

We left the floor for a couple of hours to dry and then we sealed it with six coats of Tile Doctor Seal and Go which is an ideal sealer for slate floors. We left the floor for thirty minutes in-between coats to allow it to dry. Once that was complete we attached a white pad to our buffing machine and polished the floor in order to harden the sealer and bring out the shine.

Indian Orange Slate Floor After Cleaning Indian Orange Slate Floor After Cleaning

The effects was quite dramatic and the customer who was obviously pleased with the results commented “Wow look at my beautiful floor, what a difference thank you very much for such a good professional job”.

Restoration of Orange Slate Floor in London

Indian Orange Slate Floor in London Read More »

Courtyard Cleaning

Courtyard Cleaning

Surrey Courtyard Cleaning

Please read Cleaning Terracotta Floors before you proceed on this post.

Courtyard Tiles Cleaning Courtyard Tiles Cleaning

Courtyard Cleaning Method

At the request of the customer we returned to the property to clean the courtyard area, which we deep cleaned with a jet wash machine and Tile Doctor Pro-clean solution. We started by mixing the Pro-clean with water and spread it over the surface scrubbing it with a black scrubbing pad on our rotary machine. This was left to dwell for 30 minutes then we fitted our patio spinner to our jet wash and thoroughly cleaned and rinsed the complete area.

Courtyard Cleaning Courtyard Tiles Cleaning
Courtyard Cleaning

Once again the customer was absolutely delighted with the result and as a result they now want me to maintain their floors on a yearly basis. They have also asked me to clean some other stone, wood and carpeted areas in their property, which will be done later this year.

The customer’s comments were:

“Thanks again Paul for another amazing job, we will be in touch soon with our next project for you to do, we now know that your standard of work is excellent and that you are honest, trustworthy and very hard working.”

Courtyard Cleaning in Surrey

Courtyard Cleaning Read More »

Scroll to Top