Leaking Ceramic Tiled Bathroom Renovated in Woking
The tiles in this Ceramic tiled bathroom in Woking are a great example of bad maintenance. I say this as I often get asked to refresh bathrooms and showers regularly and unfortunately this also involves rectifying previous mistakes, bodges and corner cutting.
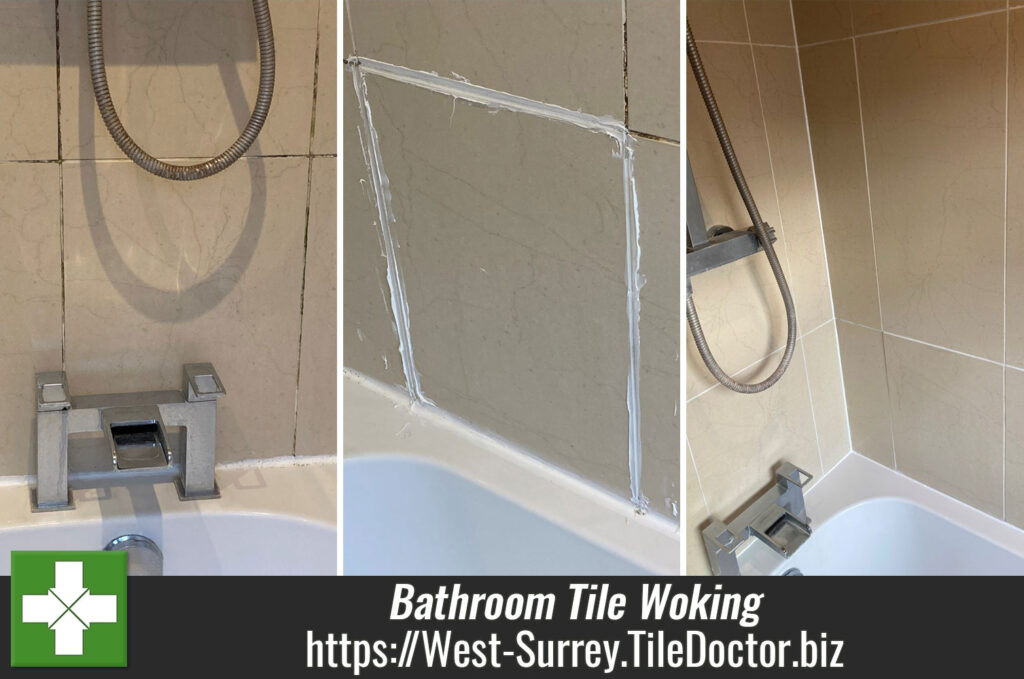
This customer asked me to investigate a water leak in his bathroom that had resulted in a growing brown mark on the kitchen ceiling directly below. While I cannot guarantee 100% with a leak that’s location is not obvious, I can guarantee to resolve cracked grout, holed tiles and missing mastic that may be the cause. Between asking me to quote and deciding to proceed with the work the customer had also asked the opinion of a plumber. He had removed the bath panel and then did something weird with white mastic on a tile. I didn’t ask how much they charged for this utter mess but can only assume he had diagnosed the grouting around this tile as the source of the leak.

I visited the property to review the tile and grout and could see that although the main issue was the poorly installed mastic sealant the grout also needed a deep clean. The best way to deal with the mastic would be to strip it all out and then replace it with new, some of it had attracted mould and turned Black in places anyway. The Ceramic tiles were in good condition and except for a little limescale I was confident they would clean up quite easily.
 |
 |
A quote was worked out to renovate the bathroom tiling which included cleaning the Tile and Grout and replacing the mastic sealant. Once complete I was confident this would resolve the leak and leave the bathroom looking like a new installation.
Renovating Ceramic Bathroom Tile and Grout
Arriving at 8:30am I spent the next four hours cutting, picking and scrapping out the abundance of white mastic smeared over the bath, tiles, floor and bath side. It was a fiddley job but all the old mastic had to go to achieve a smooth finish.
I then cleaned the Grout and Tile with Tile Doctor Grout Clean-up. I don’t usually use this product for this type of work but its acid-based and works well on limescale that’s prevalent in the South of England. Some of the grout was falling out so I filled in with some stock I always keep in the van. Once dry I sprayed the grout with an aerosol tile and grout sealer to offer further protection. Once applied the water literally just runs off the tile and grout.
Next, I removed the bath panel to investigate where the leak might be coming from. There was only one obvious location which was in the far corner so I dried it out with a heat gun. Later I would fill the area with mastic to make it watertight.
The plumber had done something odd at the bath end that required a re-build. I suspect they may have used grout as adhesive. This will never work so I took it all apart, cleaned it up and stuck it back together with tile adhesive.
For the next couple of hours, I applied carefully replaced the mastic starting with the two verticals. I used transparent mastic behind the shower door as it’s much more subtle and I think that too much White can often look like go-faster stripes.
 |
 |
As a final courtesy I cleaned the bath and shower glass before presenting the finished bathroom which had been completely transformed by the work. For aftercare cleaning I recommended the use of Tile Doctor Aqua-Pro which is a gentle spray-on shower tile cleaner. Its best to use something like this as more aggressive products can prematurely the erode the sealer I sprayed on earlier.

Professional Renovation of a Ceramic Tiled Bathroom in West Surrey
Leaking Ceramic Tiled Bathroom Renovated in Woking Read More »