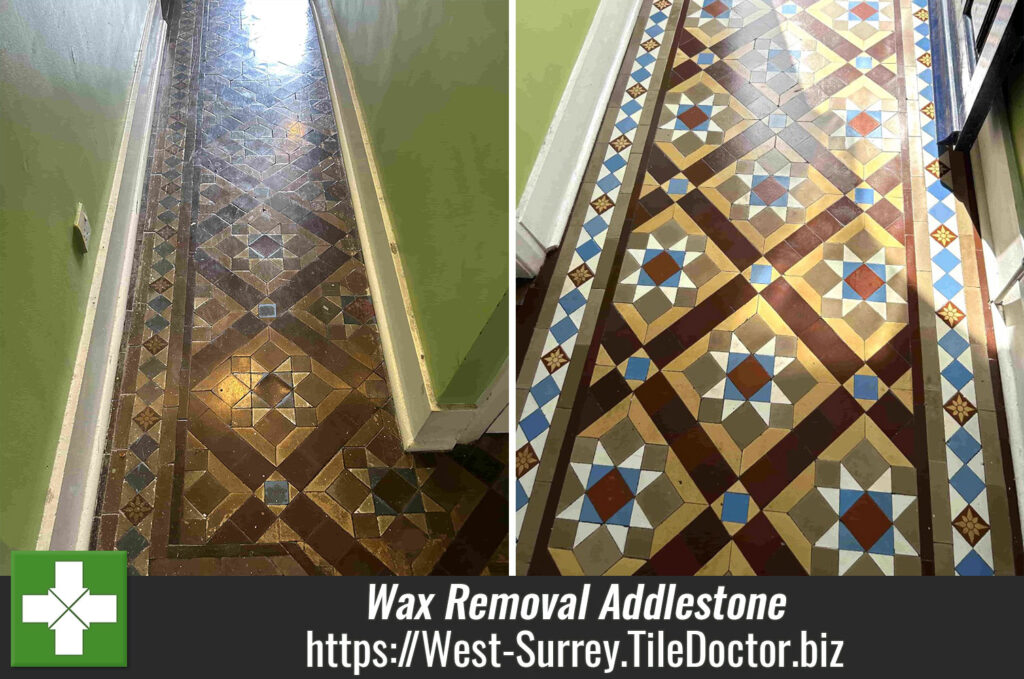
Wax Coated Victorian Tiled Hallway Renovated in Addlestone
This Victorian tiled hallway floor in Addlestone is a great example of what happens to tiles when you apply wax. I’m sure it looked great for a while but as you can imagine wax is easily scratched and after a few years it darkens and ends up looking like the photos above.

Having surveyed they hallway I could see the floor was in good physical condition with no tile replacements required. I recommended removing the wax (which would not be an easy job), then deep cleaning the floor and then re-sealing with something more modern and appropriate. I worked out a quote which they were happy with and agreed a date for my return.
 |
 |
Cleaning a Victorian Tiled Hallway
Working in small section, I applied neat Tile Doctor Remove and Go adding water occasionally so it wouldn’t dry out. This product is a strong alkaline coatings remover that weakens and breaks down the wax so it can be carefully scraped off with a sharp blade. The waste was then removed with a brush and the tiles re-treated with another application. This time applied as a strong dilution and left to soak in for a further ten minutes. Next the product was worked into the tiles using an aggressive carbide brush fitted to a rotary machine to remove what was left of the wax. The waste which was mainly a brown sludge was then extracted with a wet vacuum.
Old Victorian floors don’t have the benefit of a damp proof membrane so there is nothing to prevent moisture coming up through the floor. As a result, nothing should be applied to the tiles that would prevent moisture rising through the tile and evaporating at the surface. If its unable to evaporate it will pool and reach out to the walls potentially leading to rising damp.
Wax is not a breathable covering so I was concerned at this point that moisture had now built up under the floor and with the wax removed it would rise to the surface bringing with it salt deposits. This is called efflorescence and is a common problem with old floors like this one.
To counter this potential issue, I rinsed the floor with fresh water, and I gave it a gentle acid wash with Tile Doctor Grout Clean-up. The acidic formula of this product further cleans up the tiles and neutralises any salts in the process. The solution was then extracted with the wet vacuum and the floor given another rinse to remove any trace of product.
Before leaving, the floor was dried as much as possible with the wet vacuum and left to dry out fully overnight.
Sealing a Victorian Tiled Hallway
The next day I checked the tiles were dry with a moisture meter to ensure they were sufficiently dry to take a sealer. Applying sealer to damp tiles can result in a patchy finish and naturally wanted to avoid that.
Once I was happy the tiles had dried, I applied the first of what would be five coats of Tile Doctor Seal and Go Extra leaving thirty minutes drying time between coats. This product is a water-based sealer so has the advantage of not leaving a smell as it dries. It works really well on Victorian tiles and resulted in a subtle silky finish.
 |
 |
Once complete the floor looked great and my client later texted me the following comment:

For the aftercare of Victorian Tiles, I recommend the use of Tile Doctor Neutral Tile Cleaner, it’s a gentle but effective product that being ph neutral won’t damage the sealer which can be the problem with stronger bleach-based products.
Professional Restoration of a Victorian Tiled Hallway in West Surrey
Wax Coated Victorian Tiled Hallway Renovated in Addlestone Read More »