Guildford

Riven Slate Tiled Kitchen Floor Cleaning and Sealing Guildford

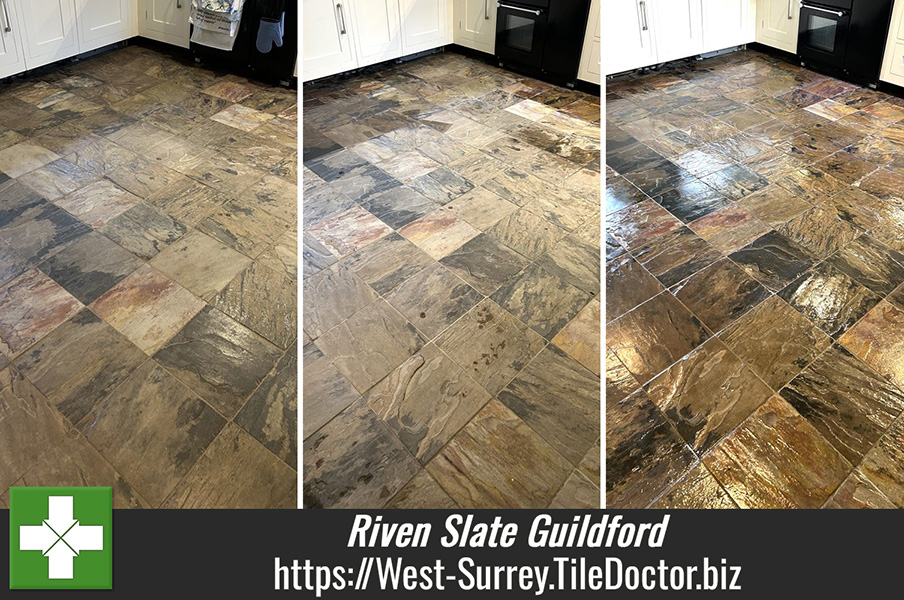
Renovating a Riven Slate Tiled Floor in Guildford

A former client from Guildford asked if we could renovate their Slate kitchen floor tiles which were not looking their best. I’d previously completed some minor works in a bathroom, and we had discussed the floor at the time. So, having already seen the tiles I knew it just needed a deep clean and seal and was able to work out a quote quite quickly without having to schedule a survey.

Riven Slate Tiled Kitchen Floor Before Cleaning Guildford

Slate like any natural stone needs to be sealed to prevent dirt from becoming ingrained, the sealer keeps the dirt on the surface where it can be easily cleaned away. Without this barrier in place, it becomes very difficult to clean effectively and absorbs dirt. Once a stone floor starts to become ingrained with dirt it becomes difficult to keep clean.

Happy with the quote, a date was scheduled to carry out the work.

Cleaning a Slate Tiled Kitchen

The first job was to add protection to vulnerable surfaces including the hallway carpet as I would be operating a wet vacuum from there. Once done work started in earnest with grout cleaning using a wire brush to scrub in a strong dilution of Tile Doctor Pro-Clean which is an effective alkaline tile and grout cleaner. Water was used to rinse away the soiling and the waste extracted with the wet vacuum.

Next up focus turned to removing any remnants of existing sealer. I didn’t expect this to be difficult as the floor hadn’t been sealed in over 15 years; however, the tiles needed to be cleaned of all sealer before re-sealing, otherwise you can end up with an uneven appearance. This was done using another alkaline cleaner called Tile Doctor Remove & Go. This is diluted with water and sprayed onto the floor where it is left to soak in for ten minutes.

The solution was then worked into the Slate using a 17-inch carbide brush fitted to a rotary machine which really gets into the nooks and crannies of riven Slate, flushing out the dirt and old sealer in the process. All the waste was removed with the wet vacuum as before and then washed down with clean, hot water.

Riven Slate Tiled Kitchen Floor After Cleaning Guildford

Sealing a Slate Tiled Kitchen

Once complete the floor was speed dried with a combination of the wet vacuum and floor fans. Later that day after checking the slate was dry with a damp meter it was sealed with four coats of Tile Doctor Seal & Go leaving half an hour between each coat. It’s not unusual to have to do the sealing on a second day if it doesn’t dry out in time, however the weather was in my favour.

The new sealer worked exceptionally well on the Slate and added an appealing subtle sheen that really highlighted the features and colours in the stone.

Riven Slate Tiled Kitchen Floor After Cleaning Sealing Guildford

For aftercare we discussed the use of Tile Doctor Neutral Tile Cleaner which being pH neutral won’t impact the sealer like the stronger products you often see available in supermarkets.


Professional Cleaning and Sealing of a Slate Tiled Kitchen Floor in West Surrey

Renovating a Riven Slate Tiled Floor in Guildford Read More »

Victorian Tiled School Entrance Floor Resurrected Guildford

Victorian Tiled School Hallway Resurrected in Guildford

The maintenance staff at school in Guilford uncovered a beautiful Victorian tiled floor under carpet at the entrance. The carpet had been secured with a very thick layer of adhesive and unsure how to proceed they contacted Tile Doctor for advice.

I popped over to take a look and conducted a test clean on part of the floor to see how it might respond to various cleaning options. From this I could see the floor had been covered with a thin layer of self-leveller as well as the adhesive. This would need to be softened and then scrapped off the whole floor a task which would be very labour intensive.

Victorian Tiled School Entrance Floor Before Cleaning Guildford

The school was keen to restore the floor and so I was asked to work out a quote for its restoration. The quote was accepted and date agreed with the maintenance team for the next time the school would be empty. In the meantime, the carpet was rolled back into position so the floor could still be used.

Cleaning a Victorian Tiled Hallway Floor

I returned on the scheduled date and once the maintenance staff had removed the carpet, I was able to start work on removing the glue and cement of the self-levelling compound. To do this I worked in sections starting with coating the floor with a strong dilution of Tile Doctor Remove & Go. This product is an alkaline stripper that soaks int the coatings and starts to break them down.

The Remove & Go was left to soak in for fifteen minutes before work started on carefully scrapping the glue and cement off the surface of the tiles. After hours of scrapping the waste was vacuumed away using a wet vax.

This left some residue over the tiles so they were given a further clean using more Remove and Go and a 17-inch wire brush attached to a rotary floor polisher. Again, all waste was removed as before and then the floor was left to dry off overnight.

Victorian Tiled School Entrance Floor During Restoration Guildford

I returned the next day to review the floor and complete any further cleaning and remove any remaining adhesive including around the edges.

Sealing a Victorian Tiled Hallway Floor

Once I was happy the floor was completely clean and free of adhesive and self-leveller work was progressed onto the final stage of the restoration which involves applying a protective sealer.

For this several coats of Tile Doctor Seal & Go were applied allowing 30-minute drying time between coats. This is a specially formulated water-based blend of acrylic polymers that provides both a stain resistant surface seal and a durable low-sheen finish.

Once complete the beauty of the floor really stood out and made for a very attractive entrance that looks great as you approach the school entrance.

Victorian Tiled School Entrance Floor After Restoration Guildford

For the aftercare of Victorian tiled floors, I recommended the use of Tile Doctor Neutral Tile Cleaner which due to its neutral ph makes it idea for the regular cleaning of sealed tiles. Many of the products you will find in supermarkets are simply too strong and will prematurely erode the sealer on a tile and so best avoided.


Professional Restoration of a Victorian Tiled Hallway in West Surrey

Victorian Tiled School Hallway Resurrected in Guildford Read More »

Acid Damaged Limestone Patio Renovation Guildford

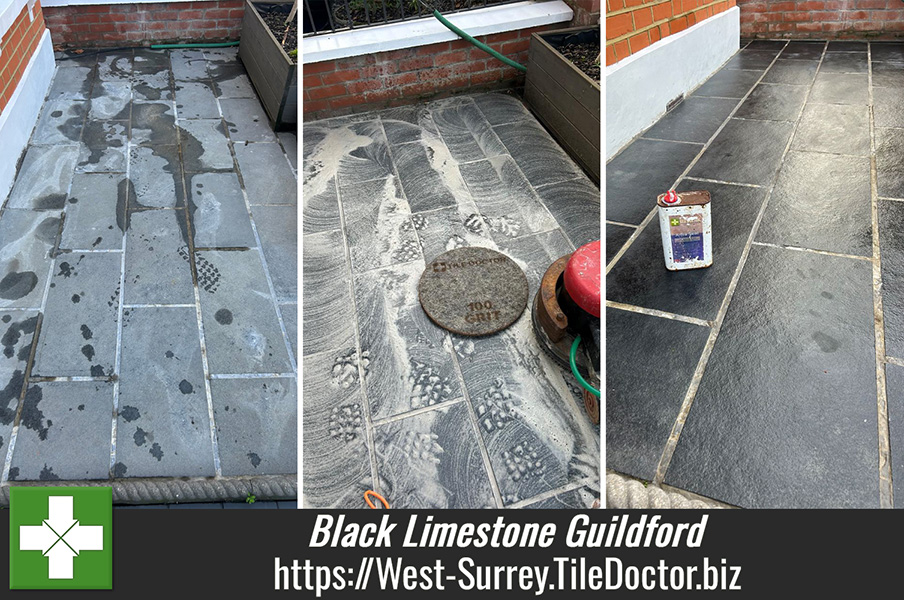
Black Limestone Patio Damaged with Brick Acid Rescued in Guildford

This client from Guildford had the front of her house painted by a contractor who managed to splash paint on their black limestone patio. To remove the staining the contractor decided it would be a good idea to rinse the patio with brick acid. It certainly got the paint off but also bleached the colour out of the limestone and etched the surface in the process completely ruining its appearance. Unfortunately, some types of stone can be cleaned with acid however other calcium-based stones are very sensitive to acid and therefore easily damaged.

Acid Damaged Limestone Patio Before Renovation in Guildford

Horrified by the state of their patio they decided to contact Tile Doctor and I was able to reassure them that there was no need to worry and that I would be able to renovate the limestone and restore the colour. I worked out a detailed quote for the work, the will bill for which no doubt would be passed onto the decorator and arranged a time for the work to be carried out.

Renovating a Black Limestone Tiled Patio

To rectify the surface etching the best solution is to burnish the limestone tiles with coarse 100 and then 200 grit diamond pads. These coarse pads cut slightly into the stone to remove the damage. The pads are fitted to a weighted floor buffer and run over each pad several times. The extra weight added to the buffer improves traction with the stone and gives an even result. The process generates a fine slurry which is rinsed with warm water and then extracted with a wet vacuum.

Acid Damaged Limestone Patio During Renovation in Guildford

Normally I would leave the patio to dry off naturally, but the weather was beginning to change, and I was concerned it could rain so the patio was speed dried using an air mover. After an hour I checked the moisture readings had dropped within the correct tolerance and the tiles were ready to be sealed.

Sealing a Limestone Tiled Patio

I chose Tile Doctor X-Tra Seal to seal this stone, applying two coats. This is an oil-based product that restores the beautiful black colour to the limestone resulting in a nice finish and made my client happy who wanted the tiled darkened. This product is also rated for external as well as internal use so it is ideal for this application.

Acid Damaged Limestone Patio After Renovation in Guildford

Once complete the Black Limestone looked fantastic much to the relief of the owner; the dark colour had returned and the features in the Limestone were visible. Before leaving I recommended the use of Tile Doctor Neutral Tile Cleaner for regular maintenance going forward. It’s always tempting to use something more aggressive on external stone but doing so will risk the problem repeating.


Professional Restoration of a Limestone Tiled Patio in West Surrey

Black Limestone Patio Damaged with Brick Acid Rescued in Guildford Read More »

Victorian Tiled 3D Geometric Patterned Floor Renovation Guildford

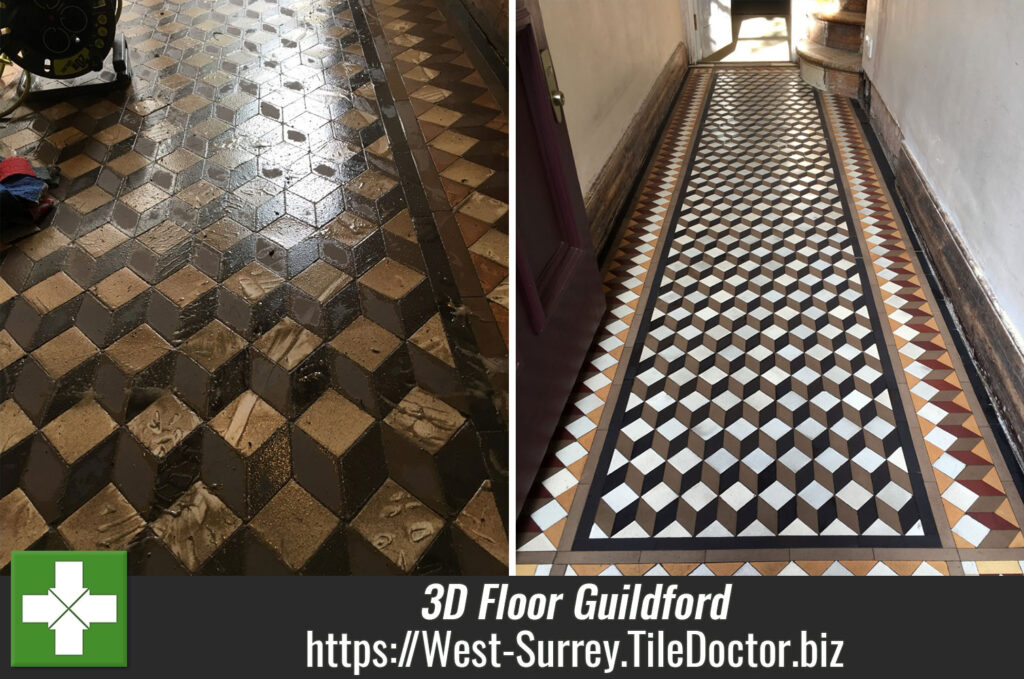
3D Patterned Geometric Victorian Tiled Hallway Floor Renovated in Guildford

I’ve cleaned many interesting geometric Victorian tiled floors in my career but none so eye catching as this example at a property in Guildford which featured a beautiful 3D pattern. My client had got in touch to see if I could restore the floor back to its original, it was currently looking quite grubby but thankfully appeared to be physically intact with no loose or broken tiles.

I was confident the floor would look great with a bit of love and care and all it needed was a deep clean to extract all the ingrained dirt and then sealing. I provided a quote for the work and arranged a convenient time to complete the work for them.

Cleaning a Victorian Tiled Mosaic Hallway Floor

It was quite soiled to start with, so I gently sprayed Tile Doctor Pro-Clean over all the tiles, leaving the product to dwell for twenty minutes whilst keeping the tiles moist. Whilst this has happening I setup a weighted buffing machine fitted with a coarse 100-grit diamond pad. I’m able to attach three heavy iron bars to the front of this machine to add more heft to the machine; increasing the weight improves downward pressure and traction to equal a better result.

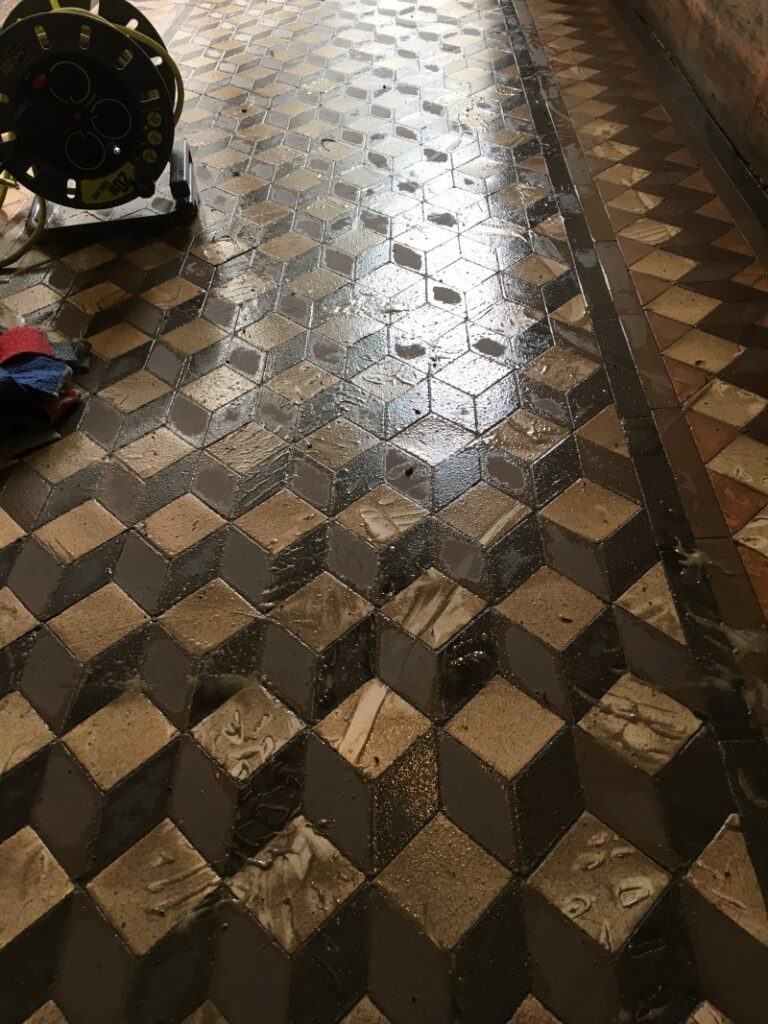
Victorian Tiled 3D Geometric Patterned Floor During Cleaning Guildford

Applied with water for lubrication the pad is run over each of the tiles in turn. This is quite an aggressive process that cuts a thin layer from the tile which is absorbed into the water turning it into a slurry and ensuring no dust is generated. Marching up and down, slowly from front to rear I slowly deep cleaned the tiles. Once I was satisfied, they were as clean as they could possible be all the waste with a wet vacuum.

The floor was then washed with hot water and then extracted with the wet vacuum again, this was done a couple of times to remove any remaining soiling. Hot water is preferable for this as it evaporates quickly.

The buffing machine doesn’t reach into the corners, so to make sure they were not missed I used handheld diamond blocks; again, rinsing the soil created away with water and extracting with the wet vacuum afterwards.

The floor was then left to dry out overnight and I asked the owners to try and avoid walking on it.

Sealing a Victorian Tiled Hallway Floor

Having discussed the clients’ needs and expectations of the final finish earlier it was clear they wanted the floor to have a subtle shine to it. They had said that a matte finish was a little boring but they thought a shiny finish was a little too much, so we opted for a sheen finish. To provide this effect I had recommended Tile Doctor Seal and Go Extra which is a fine compromise that offers a subtle shine and is tough wearing. It’s actually my personal favourite that I use on many types of tiled floor.

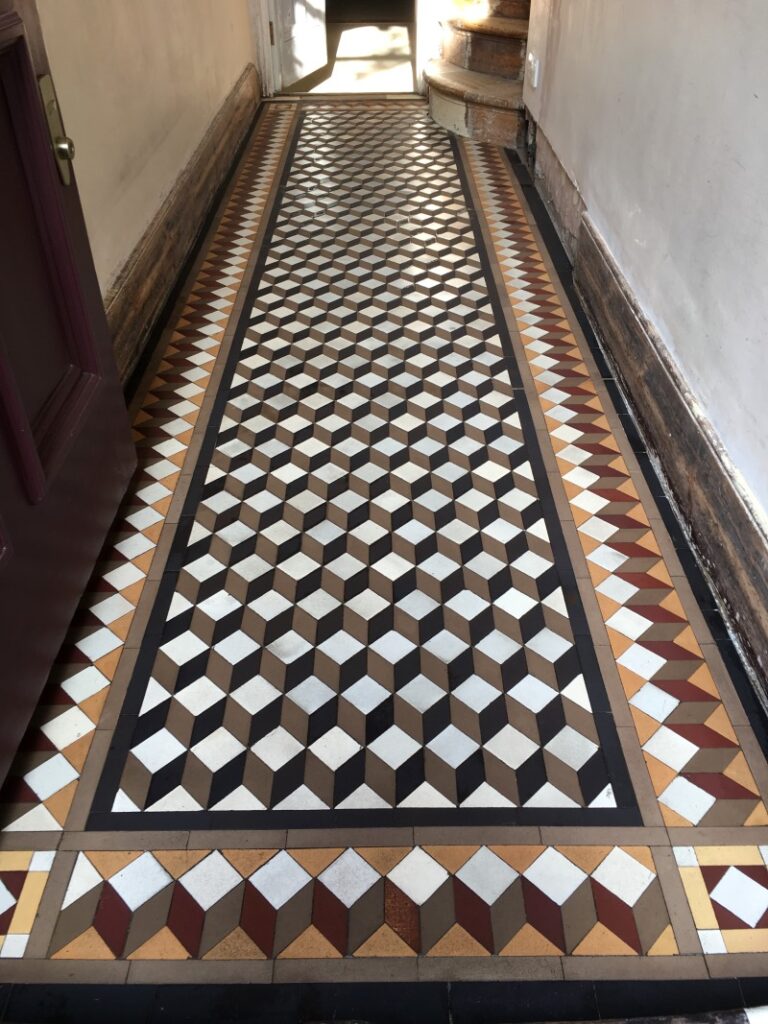
So, the following day I applied several coats until I was satisfied the finish was as hoped. The floor looked great and created a stunning entrance to the property. This was now more in keeping with the rest of the original features in the period property.

Victorian Tiled 3D Geometric Patterned Floor After Cleaning Sealing Guildford

My client was over the moon with the work and before leaving I took time to discuss aftercare. I recommended the use of Tile Doctor Neutral Tile Cleaner for regular cleaning; this product won’t impact the newly applied sealer. It’s also mild enough to use every day which is always a possibility in high traffic areas such as a hallway.


Professional Restoration of a Victorian Tiled Hallway in West Surrey

3D Patterned Geometric Victorian Tiled Hallway Floor Renovated in Guildford Read More »

Exterior Ceramic Tiled Rooftop Patio Grout Cleaning Guildford

Grout Cleaning a Ceramic Tiled Rooftop Patio in Guildford

How about this for something different, a roof top patio in Guilford that was tiled with Ceramic Tiles. The work has been done some years prior and I understand from the owner that a crane was needed to bring all the materials onto site. The owner had called me in because grout had turned brown and there was what appeared to be limescale forming in some places.

Ceramic tiles by their very nature are very easy to clean however grout can be problematic due to its cementitious rough texture that can trap dirt and cause it to discolour. Ceramic tiles actually make the problem worse as their glazed coating makes them impervious and dirt washes off the tile straight into the grout line.

Exterior Ceramic Tiled Rooftop Patio Before Grout Cleaning Guildford

It was clear to me that deep cleaning the grout would improve the general appearance of the patio and after agreeing the solution with the client a date was agreed for my return to do the work which should only take a day. I needed a dry period to do the work and fortunately the weather gods were in our favour so the date worked out.

Cleaning a Ceramic Tiled Patio Floor

I returned on the scheduled date and set about preparing the tile and grout with strong dilution of Tile Doctor Pro-Clean. This product is our go to tile and grout cleaning product and works best when left to soak in for ten minutes first. I then scrubbed all the grout lines by hand with a wire brush to really work the solution into the grout and get the best result. Once done the now dirty cleaning solution was rinsed off with water and extracted with a wet vacuum.

Although an improvement there were several areas that had experienced deep seated staining. I suspect the overhanging trees and other greenery were to blame for some of the staining but being outside and exposed to the British weather can also cause issues. To resolve I removed the stained grouting by running a sharp blade along the joints and a Fein oscillating tool. Once done the grout was replaced with a matching product.

Next, I removed the limescale with Tile Doctor Grout Clean-up and a Stanley blade. For maximum effect the product is left to soak in for around twenty minutes first so I used this time to bring up my machinery in preparation for cleaning the tiles. I use a rotary floor cleaner fitted with a black nylon pad to remove the dirt. After vacuuming away the limescale and other detritus I cleared the area of all tools so I could seal the grout.

Sealing Grout on a Rooftop Patio

I left the patio to dry out for a few hours and then proceeded to apply the sealant for which I used Tile Doctor Ultra-Seal. We find the best method is drop the sealer along the grout line using a Pipette and then to rub off the excess later.

Exterior Ceramic Tiled Rooftop Patio After Grout Cleaning Guildford

Sealing grout this way is a slow but very effective method but it’s worth doing as it will protect the grout from future staining, allowing it to keep its appearance for longer and make it easier to clean. I often get asked how long sealers last but it’s a tricky question to answer in this case as being external it really depends on the weather.


Professional Clean of a Ceramic Tiled Rooftop Patio in Surrey

Grout Cleaning a Ceramic Tiled Rooftop Patio in Guildford Read More »

Worktop Grout Before After Renovation Guilford

Re-colouring of Grout on Ceramic Tiled Worktops in Guildford

The Splashback and Worktops in this Guilford Kitchen had been made from Glazed Ceramic tiles. However, the kitchen units had been extended several times and each time it seems a different shade of grout had been used. Dark grey, light grey and even grout with a brown tint in places. Naturally, she wanted a consistent colour throughout, and the grout needed a good clean.

Tiled Worktop Before Grout Colouring in Guilford

You don’t see so many tiled worktops these days, Granite, Marble, Corian and laminates are more popular however it was an interesting project, and I was happy to help. I was confident we could achieve a consistent appearance by recolouring the grout which would also make the grout easier to clean and give the appearance of the Kitchen a lift.

Tiled Worktop Before Grout Colouring in Guilford

Cleaning Ceramic Tiled Worktops

Firstly, I prepared the whole area by cleaning the grout. Grout colours achieve better adhesion when the grout is free of dirt and grease and Tile Doctor Grout Colourant Pre-Treat Cleaner is ideal for this. It’s an acid-based grout cleaner that cleans and etches the surface of the grout to make a superior bond with the colourant.

Another option is to use Tile Doctor Grout Clean-Up and as I already had a large bottle of this on the van, I decided to go with this instead diluted 50:50 with water. Working in sections I brushed it into the worktop and splashback grout and left it to dwell for thirty minutes before scrubbing it in with a firm wire brush. This action released the dirt which was then rinsed away with more water and then extracted with a wet vacuum to keep the mess to a minimum.

Following the cleaning the grout was now wet, so for the next half an hour I speed dried the grout with a heat gun. The colourant needs to be applied to dry grout, so this was a necessary step to ensure the best result.

The client had selected to use Tile Doctor Grout Colourant in Light Grey so once dried I started the colouring, brushing it in carefully with a narrow paint brush. The product dries quickly so any excess that gets onto the tile must be wiped off immediately. The process is quite slow and meticulous requiring a steady hand, but the results speak for themselves.

There was no need to apply a sealant over the colourant and the nature of the product acts as a barrier over the grout making it much easier to keep clean. Tile Doctor has a range of Grout Colourants in ten popular colours so there is plenty of choice. Using a colourant is much easier and less labour intensive than scraping the old grout out and re grouting. My client was also keen to avoid the mess of this option.

Tiled Worktop After Grout Colouring in Guilford

Once complete the tiles looked so much better, certainly my client was very pleased with the finish and left the following review.

“I’m very happy with every aspect of Rupert’s work, he renovated my kitchen worktops and splash backs. Great job. Thank you.”

Tiled Worktop After Grout Colouring in Guilford


Professional Renovation of Tiled Worktops and Splashbacks in Surrey

Re-colouring of Grout on Ceramic Tiled Worktops in Guildford Read More »

Ceramic Bath Tile Before After Cleaning Guildford

Restoration of a shower and bathroom in Guildford

A family living in Guildford were in touch recently about restoring the appearance of their Ceramic tiled shower and bathroom. They were about to put the property up for sale and were concerned the grubby grout might put off potential buyers. First impressions do count so renovating a bathroom or kitchen before selling is a really good idea and will help you achieve a better price.

Bath Shower Tile Grout Before Cleaning Guildford Bath Shower Tile Grout Before Cleaning Guildford

In this case the Ceramic tiles were dirty and black with mould in places which looked unhygienic and uninviting. Additionally, the mastic sealant between the tile and bath was tired and worn to the extent that water could end up leaking behind the seal. After visiting the property, they were pleased to hear I could help and happily accepted our quote which was based around a days work and some materials.

Cleaning/Repairing a Ceramic Tiled Shower and Bathroom

Firstly, I cleaned the grout using a Tile Doctor product called Duo Clean which is designed to tackle dirty grout and mould. I sprayed the product along all the grout lines and left it to soak in for about fifteen minutes. Once ready I brushed them with a firm wire brush then rinsed off with water. Next, I cleaned the tiles using a strong dilution of Tile Doctor Pro-Clean which was decanted into a spray bottle and sprayed onto the wall tiles. After ten minutes I then used a handheld buffing machine fitted with a small white buffing pad to shift the dirt and buff up the white tiles. After rinsing the slurry off with water you could see a marked improvement.

I hand dried the tile and grout with a cloth and then set about stripping out the old white mastic sealer with a sharp knife. This took some time, as you have to be careful not to scratch the bath or the tile.

By this time the grout had dried off fully and I was able to see if more work was required. To achieve a uniform colour throughout. Mould and some cleaning products can discolour grout permanently and, in this case, there was some grout staining I was unable to remove. We had discussed this possibility earlier and how it would be best resolved using a white grout colourant. So, I carefully applied Tile Doctor Grout Colour which is painted on with a small brush with any excess wiped off the tile before it can set. This resulted in a uniform white grout throughout and really gave the whole bathroom a lift.

Sealing a Ceramic Tiled Shower and Bathroom

With the cleaning process completed I applied a new white mastic between the bath and tile and along the verticals. This is done with the bath filled with water and then left for 24 hours to allow the silicone to fully cure.

After the grout colour had dried, I applied an aerosol Tile and Grout sealer over the whole surface and then lightly polished off any excess with a clean cloth. This does two things; one it adds a further layer of protection to the new grout colour and to the surface of the tiles. Secondly Ceramic tiles are non-porous, but bacterial dirt can still get a grip on the surface, with the sealer in place you will find water quickly runs off without getting a chance to get a hold.

Bath Shower Tile Grout After Renovation Guildford Bath Shower Tile Grout After Renovation Guildford

Sealers do wear off, so I recommended re-applying it every year. I had plenty left over and gave it to the customer when I finished using it. For regular cleaning of tiled shower areas, I recommend they use Tile Doctor Aqua-Pro this will neutralise any acid build-up caused by acidic shampoos etc.


Professional Renovation of a Ceramic Tiled Bathroom in West Surrey

Restoration of a shower and bathroom in Guildford Read More »

Wood Effect Ceramic Tiles Before After Polymer Grout Haze Removal Guildford

Removing Polymer Grout Haze from Wood Effect Ceramic tiles in Guildford

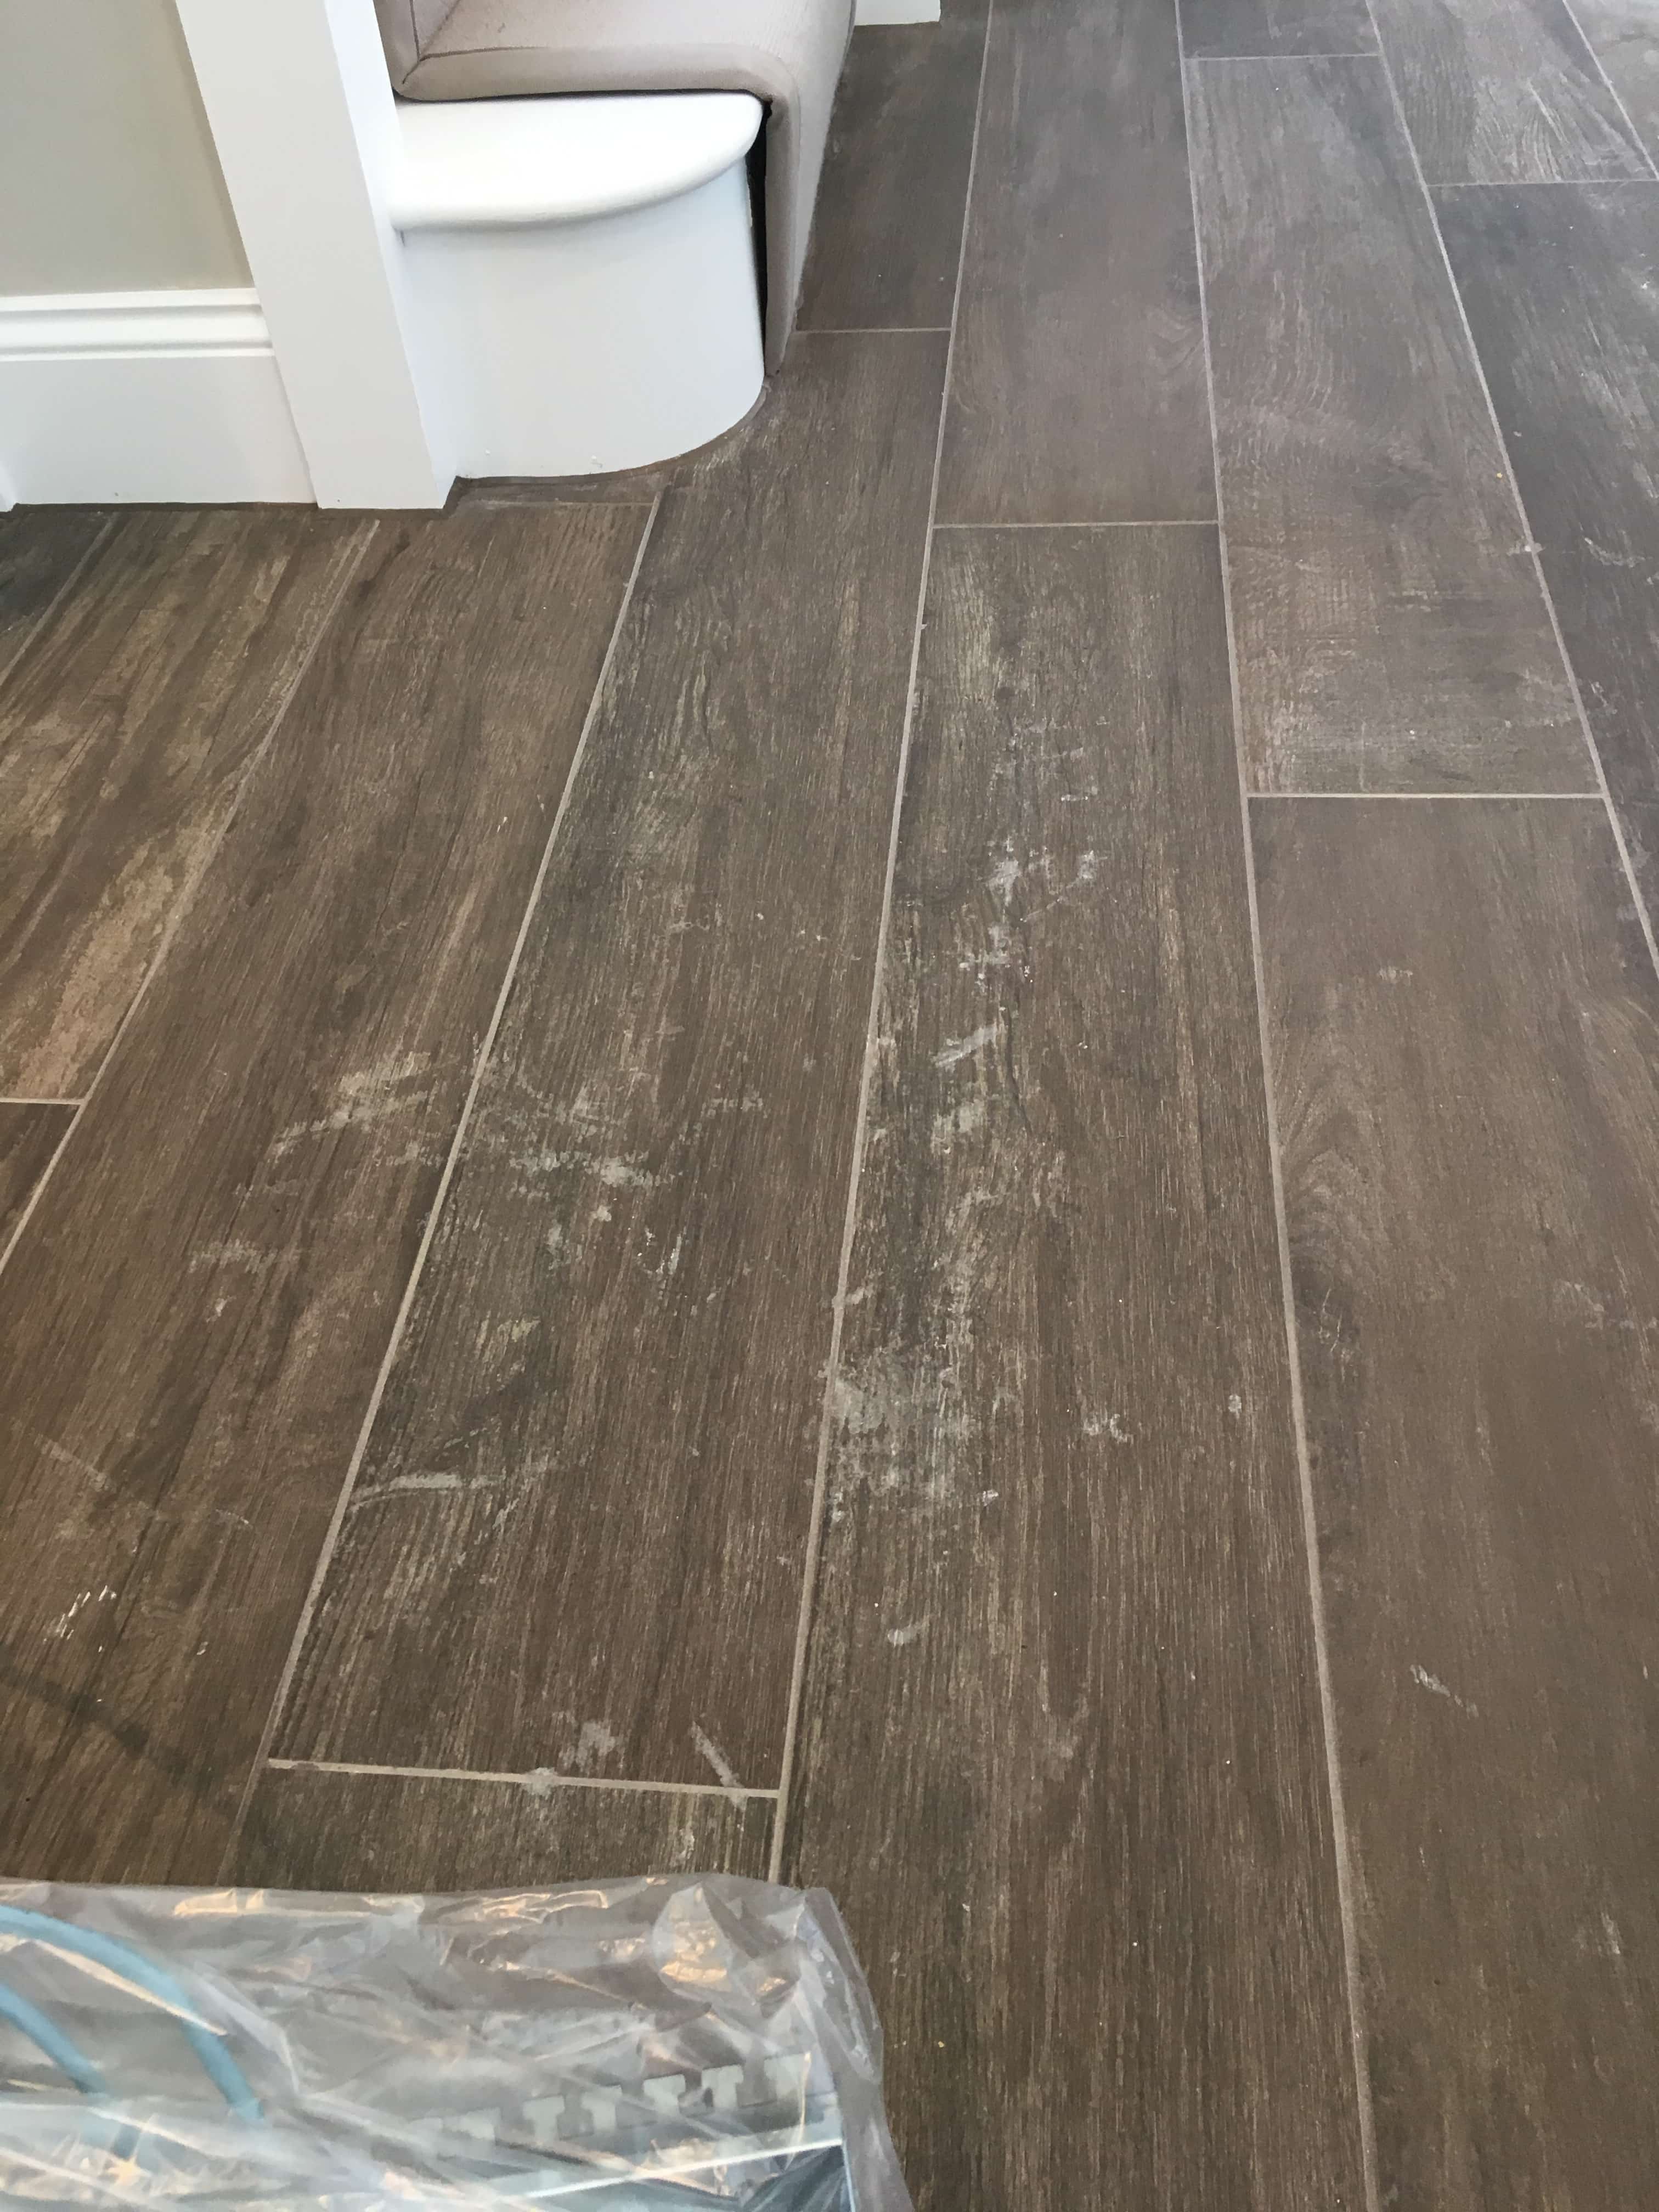
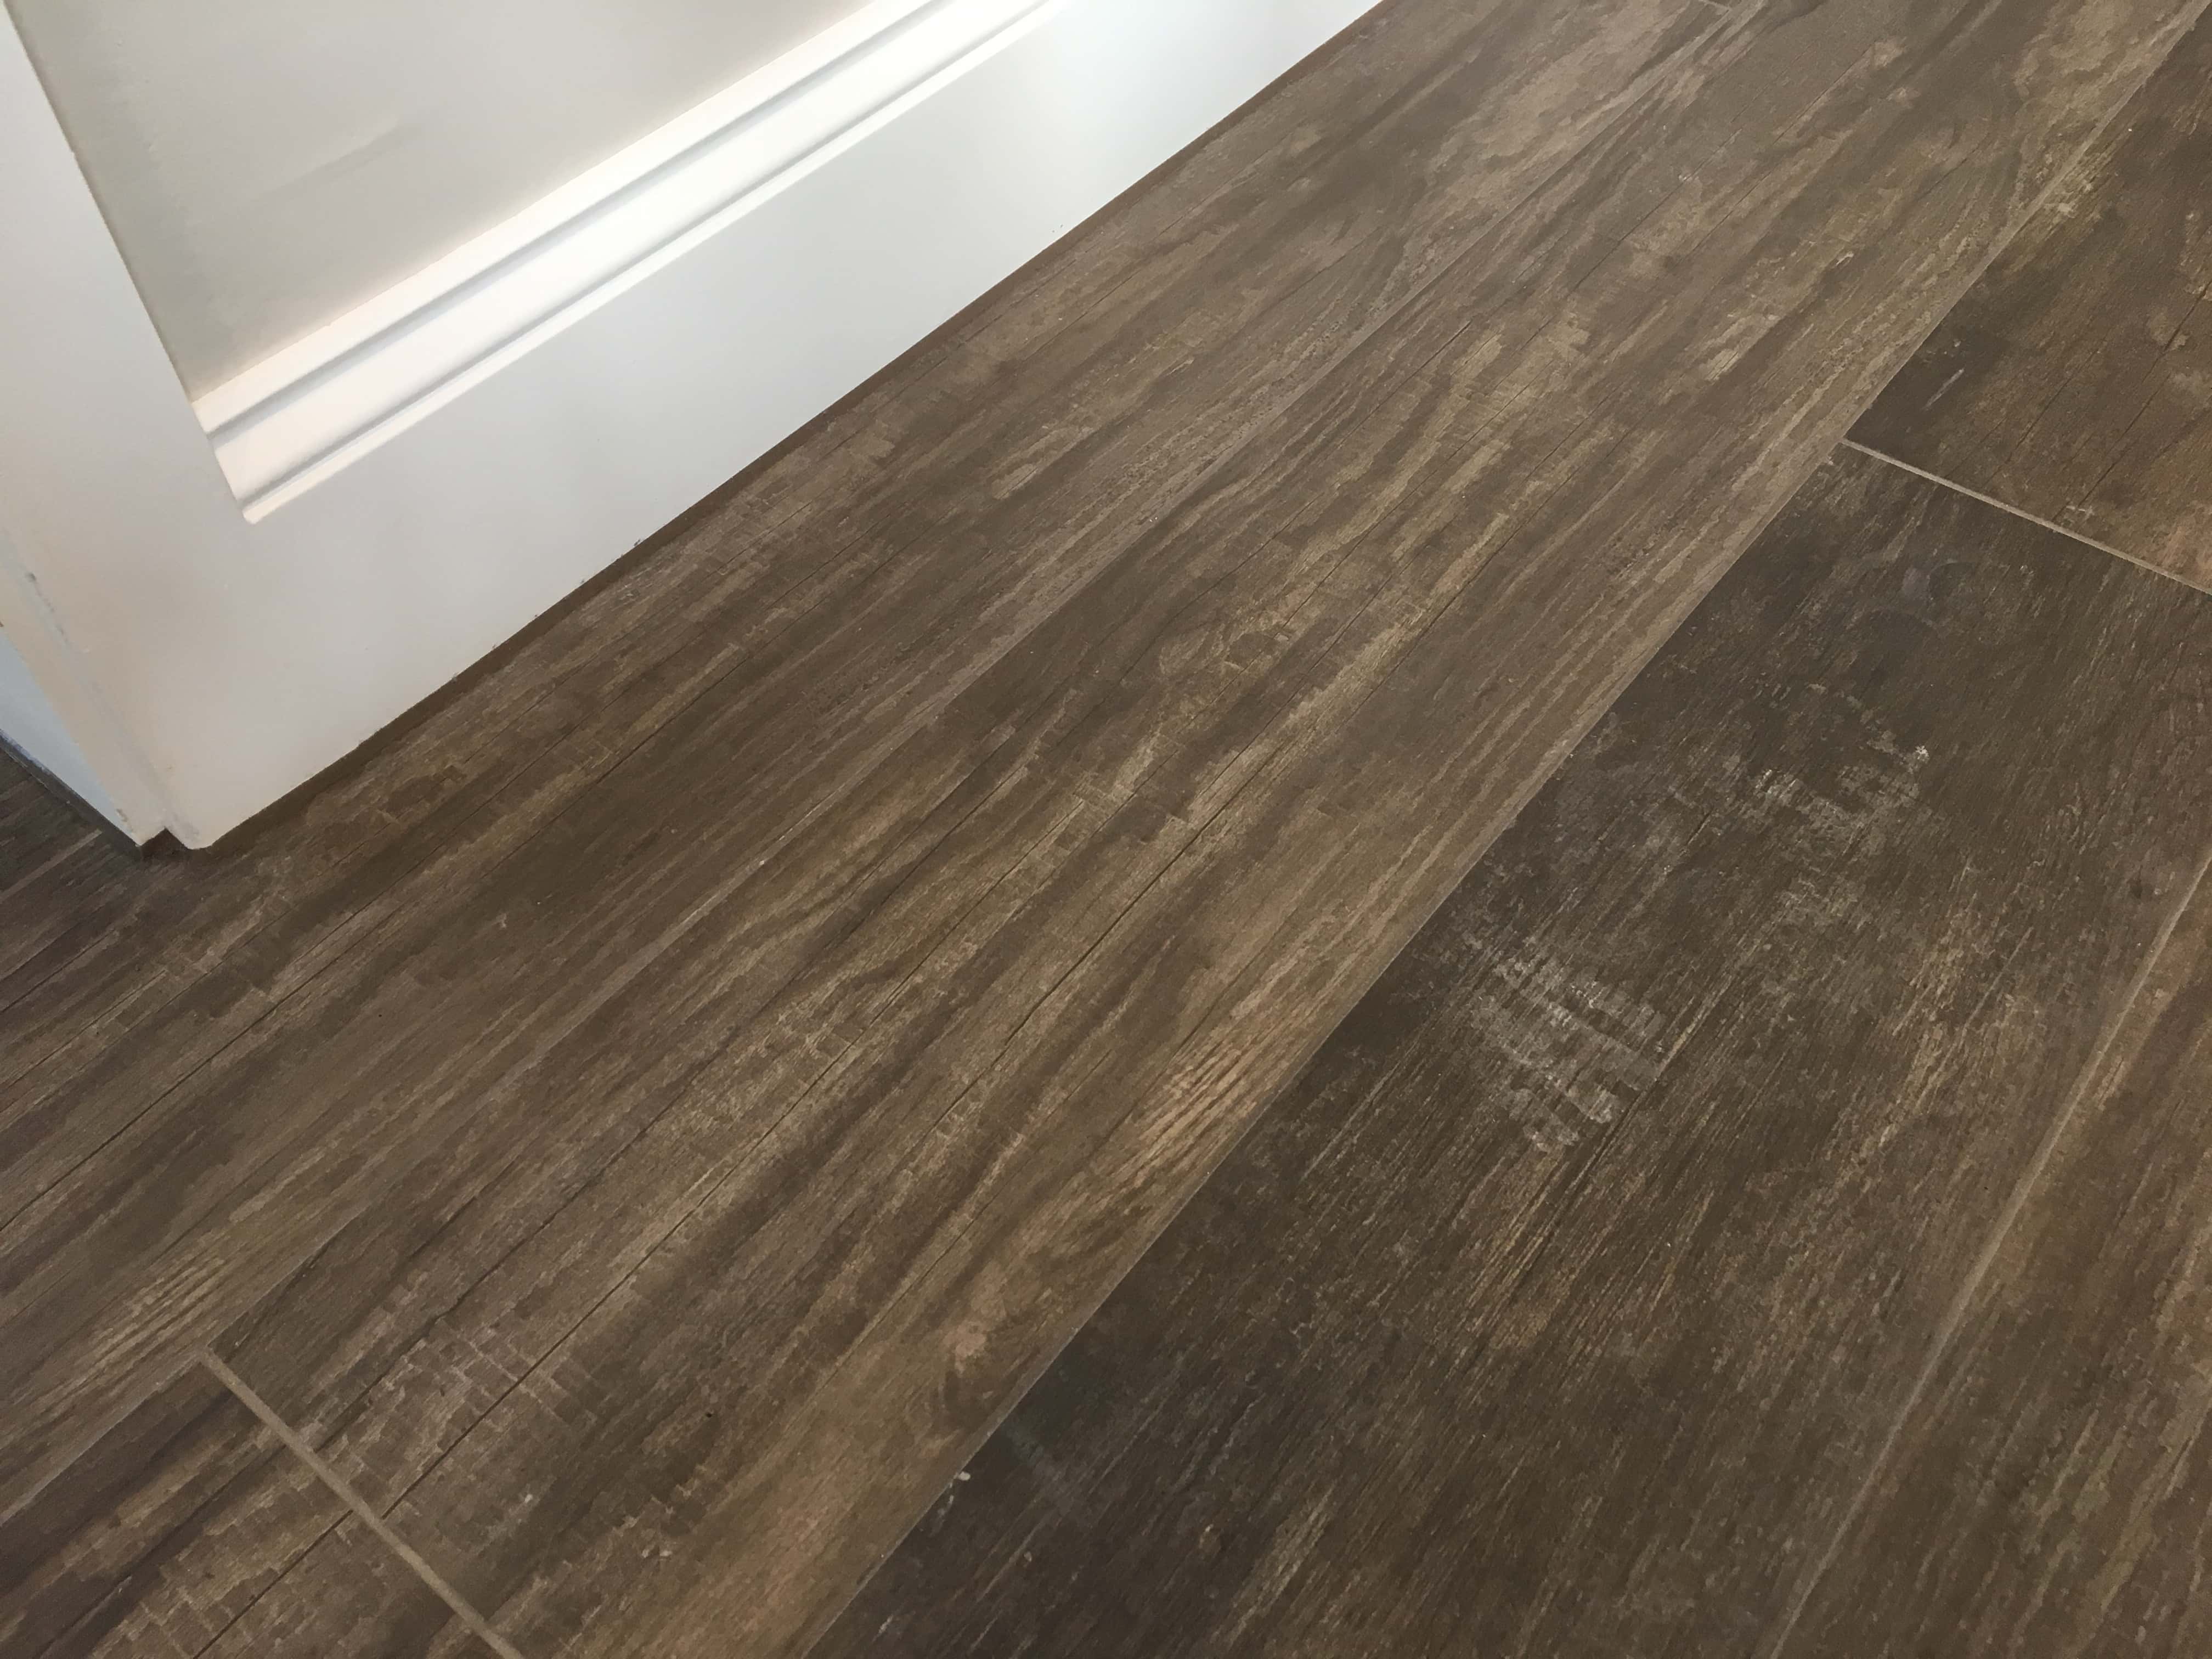
Grout haze or grout smears as it is often called can be a huge problem when laying tiles. Grout haze is basically grout that has been left to dry on the surface of the tile after installation. It’s a common problem which is exacerbated by the use of quick drying products. Take for example this interesting Wood Effect Ceramic Tile installation at a house in Guildford following installation by a builder.

I was a bit slow in following up on the initial enquiry as we had been very busy so by the time, I got in touch I was told they had employed someone else to carry out the work. I apologised for my late response and said to call me if he needed help in the future. Three days later I got a call so we arranged a visit so that I could carry out a test and quote a price.

Grout Haze on Wood Effect Ceramic Tiles Before Removal Guildford

As it turns out the builder had returned and failed to remove the grout haze and so had a rival firm that seemed more interested in selling unnecessary sealer than fixing the problem. I was astonished to see what a state the builder had left his floor. Grout was all over the floor with footprints walked across thresholds and more. I could understand it if there was some grout was missed after installation but not to this level!

I carried out a successful test and confirmed to the customer that there was absolutely no need to rip and replace his £2k floor. We agreed a date to resolve the problem and to say he was relieved was an understatement!

Grout Haze on Wood Effect Ceramic Tiles Before Removal Guildford

Removing Polymer Grout Haze

The builders had used Mapei grout which contains polymers. Polymers offer better flexibility and adhesion, however in order to remove the grout haze we would first need to break down the polymers in the grout first and this is why the rival firm failed.

With that in mind, my first action was to apply Tile Doctor Remove and Go to the floor and leave it to dwell for five to ten minutes. I then worked it into the tile using a scrubbing pad fitted to a rotary machine.

After washing the soil away with warm water and extracting with a wet vacuum I applied Tile Doctor Grout Clean-up to treat the grout. Grout Clean-up is an acid-based product that breaks down the grout so it can be rinsed away and extracted as before. Afterwards I rinsed the floor with warm water and extracted again to remove any trace of product and neutralise the floor. After removing as much moisture as possible with the wet vacuum I speed dried the tiles with a blower.

Wood Effect Ceramic Tile Installation Problem Resolved

Ceramic tiles won’t accept a sealer so once the floor had dried the job was finished and it took less than a day.

Grout Haze on Wood Effect Ceramic Tiles After Removal Guildford

The customer was over the moon with the difference. While his floor was in such a state, he has been unable to bring in new furniture as the serious possibility of removing the tiles was hanging over him.

Relieved that the problem was now resolved he kindly left the following review:

“I had a floor that had just been laid with very heavy grout haze. I had already had advice from two other professional floor cleaners who had advised me that the floor was irreparable and would need to be pulled up. As soon as I spoke with Rupert, it was clear he was extremely knowledgeable. He asked questions none of the other companies had. By understanding the specific nature of the problem, he was able to solve it by first removing the grout polymers and then applying an acid wash. The floor came up brilliantly. Rupert was the only person I spoke to that could fix this, everyone else told me I needed to replace my floor! Superbly knowledgeable, professional and did an excellent job. Don’t bother speaking to anyone else, just call Rupert! “

Grout Haze on Wood Effect Ceramic Tiles After Removal Guildford


Professional Clean of a Wood Effect Ceramic Tiled Hallway in West Surrey

Removing Polymer Grout Haze from Wood Effect Ceramic tiles in Guildford Read More »

Scroll to Top