marble tiles

Limescale Stained Silver Wave Marble Tiled Bathroom Floor Renovation Addlestone

Limescale Stained Marble Tiled Bathroom Floor Renovated in Addlestone

The pictures below are of a Silver Wave Marble Tiled bathroom floor in a property that was let to the same tenant for the last five years. Unfortunately, Addlestone is a hard water area and the staining on the stone had got so bad it had eaten into the surface slightly. There were also chemical stains all over the tiles due to the use of strong limescale removers which are not recommended for use on Marble due to their acidic nature.

Limescale Stained Silver Wave Marble Tiled Bathroom Floor Before Cleaning Addlestone

The landlord was concerned the property wouldn’t be able to find a new tenant with the floor in that condition and so wanted it renovated and ideally made to look like new so it could be rented out again. Naturally the request was to do this work as quickly as possible. I worked out a quote to deal with the issues which was accepted and the landlord left me the key so I could get on with the work.

Cleaning a Marble Tiled Bathroom

I started the renovation by cleaning the grout with a strong dilution of alkaline Tile Doctor Pro-Clean and a wire brush. The limescale was all over the grout so was difficult to remove but with a bit of elbow grease came away eventually with the use of a coarse burnishing pad. This started with the application of a 100-grit diamond pad which is very aggressive. I’ve found in the past it’s the most effective way of removing chemical stains on stone or at least getting them to a point that they can be easily masked by the sealer.

The slurry from this was rinsed off and extracted and I then worked my way through finer burnishing pads including 400, 800 and 1500-grit ensuring I took my time with the 400 to really work the top of the stone. Due to the small size of the bathroom, a hand-held machine fitted with 6-inch versions of the pads was used. The pads are applied with water and after each pad the resultant slurry was removed with a wet vacuum. This technique removed all the staining but left the marble looking very grey and sad, however the limescale was gone and I wasn’t finished yet.

Sealing Silve Wave Marble Bathroom Floor Tiles

After a final rinse and extraction, the tiles were dried off and then once fully dry a coat of Tile Doctor X-Tra Seal was applied onto the stone which immediately bought the colour back. This is an oil-based sealer rated for external use that soaks into the stone occupying the pores and thereby preventing dirt from becoming ingrained.

This coat was allowed to dry for a while before the excess sealer was removed with a clean microfiber cloth. Once this had settled, the floor was given a quick polish with a very fine 3500-grit pad and this really finished off the Marble leaving a deep shine.

Limescale Stained Silver Wave Marble Tiled Bathroom Floor After Renovation Addlestone

The work went well and completely transformed the look of the bathroom, certainly the landlord was pleased and has already been in touch about some other work that needs completing.

For the aftercare of Marble tiles, I recommend the use of Tile Doctor Stone Soap which is a mild yet effective cleaner that helps maintain polish.


Professional Restoration of a Marble Tiled Bathroom in West Surrey

Limescale Stained Marble Tiled Bathroom Floor Renovated in Addlestone Read More »

Red Brown Marble Tiled Floor Before After Polishing Weybridge

Red and Brown Marble Tiled Kitchen Floor Polishing Weybridge

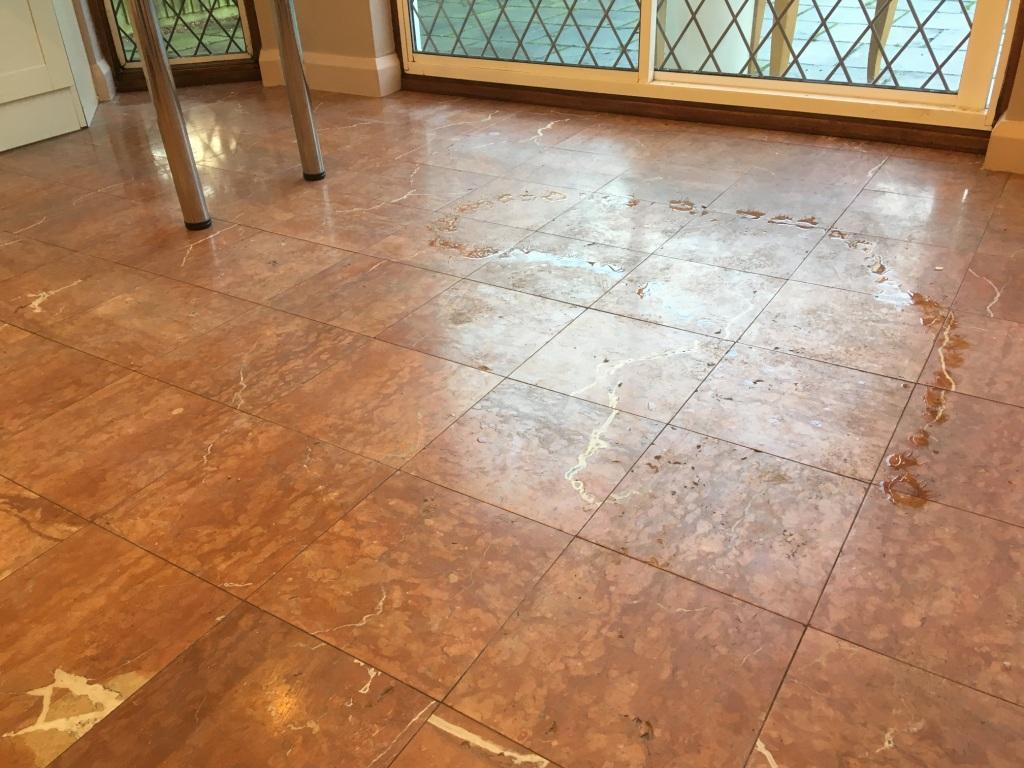
If you have a Mable tiled floor which is not looking its best, then the transformation I achieved on this floor at a property in Weybridge will definitely be on interest. Having first spoken with the owner on the phone I went over to the house to take a better look at the floor and found that the deep red and brown Marble tiled kitchen floor was really dirty and totally lacking in colour or polish.

The floor hadn’t been professionally cleaned for some time and was now dirty and suffering from the actions of a puppy which likes to charge up and down. The Marble was also full of holes which the client explained had been getting larger. This is not usual for natural stone as it can be very sensitive to acidic cleaning products which if used constantly over time will start to dissolve the stone.

We discussed the remedies available, agreed a cost and arranged a mutually convenient time to carry the work out. I always like to do a site visit to survey the tiles and ideally run a test clean to determine the best methods for resolving the problems. This enabled me to give a more accurate quote and it also gives the customer confidence in my abilities.

Marble Tiled Floor Before Polishing Weybrige

Deep Cleaning Red and Brown Marble Kitchen Tiles

Firstly, I removed the existing sealer with a 400-grit diamond burnishing pad which is applied with water. Although this initially appears to make the floor look worse, this is only temporary, sometimes you have to make it look a little worse before it can get better! Once this was done the floor was rinsed with water to remove the slurry generated and this was then extracted off the floor with a wet vacuum.

Then for the next couple of hours I worked my way from the back door to the front filling all holes with a special expanding resin, then smoothing off as I went to ensure the smoothest of finish could be achieved. Some of the holes were indeed quite large, so there was quite a lot of work to do.

Once the filler had dried I started the polishing process using the 800 and then 1500 grit burnishing pads, once again with more water to lubricate and rinsing the floor in between polishing and removing the slurry as before. This process took much of the day, so I left the floor to dry off and came back the next day to complete the polishing and seal the Marble.

Sealing Red and Brown Marble Kitchen Tiles

The next day I returned and completed the polishing process by applying the fourth burnishing pad which is an extra fine 3000 grit pad, you apply the pad dry with only a little amount of water sprayed onto the floor in process we call a spay burnish and this final pad really brings up the polish in the Marble.

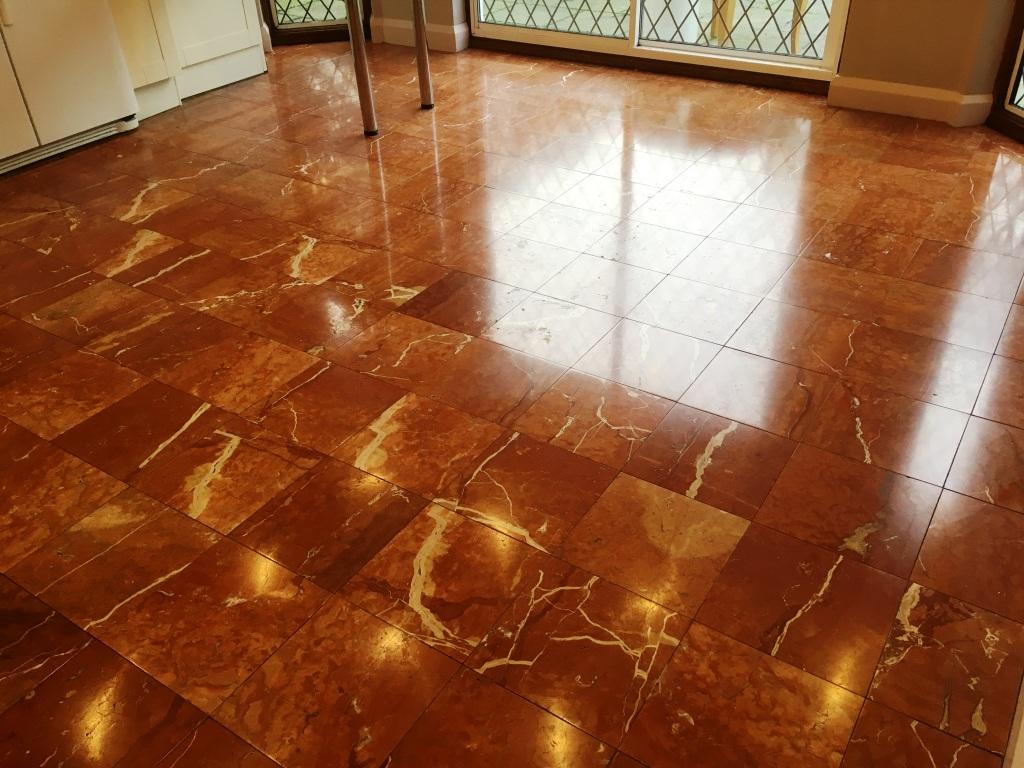
Once the polishing had finished I left the floor for a little while to make sure it was nice and dry and then I applied two coats of Tile Doctor Colour Grow sealer. This is a colour intensifying sealer that provides durable protection by impregnating the pores in the stone with sealer, so dirt cannot become ingrained there. As you can see from the pictures the sealer dramatically enhanced the natural colours in the stone.

Once dry I backed my way out of the house with a final finishing polish using a white buffing pad to remove any excess sealant and bring up the sheen of the tiles even further. I left instructions with the client to keep off for a couple of hours while the sealer cured.

The client was over the moon with the end result, the floor was left shiny, protected and looking in a fabulous condition.

Marble Tiled Floor After Polishing Weybrige


Professional Restoration of a Marble Tiled Kitchen Floor in West Surrey

Red and Brown Marble Tiled Kitchen Floor Polishing Weybridge Read More »

Cleaning & Grout Colouring a Marble Tiled Bathroom in Earls Court

Cleaning & Grout Colouring a Marble Tiled Bathroom in Earls Court

These Marble Tiles were installed in the bathroom at a residence in Earls Court, west London; the Marble certainly gave a luxurious effect but had dulled over time, on top of that the grout had stained in places and both were in need of really good deep clean.

Marble Tile Cleaned

Cleaning Marble Tiles

We set about cleaning the Marble Tiled floor using a mild dilution of Tile Doctor Pro-Clean worked in with Deck Brushes. Once we were happy the floor was rinsed with clean water to remove and chemical residue and we then began polishing the floor using a buffing machine fitted with a green burnishing pad, the green pads are encrusted with very fine diamonds and used with a small amount of water to produce a high shine finish.

Marble Tiles Cleaned and Polished

Applying Grout Colourant

The last step was to colour the grout which is easily done using a bottle of Grout Colourant. This is applied into the grout lines using a tooth brush; as well as changing the colour the product provides an epoxy coating on top of the grout protecting it against future discoloration.

The customer was certainly pleased with difference and said the “the results are amazing” when she returned home from work that evening.

Marble Tiles Cleaned and Polished
 

Cleaning and Polishing Marble Bathroom Tiles

Cleaning & Grout Colouring a Marble Tiled Bathroom in Earls Court Read More »

Polishing a scratched Marble Floor in Eaton Square, Belgravia, London

Polishing a scratched Marble Floor in Eaton Square, Belgravia, London

We were asked to polish this marble floor in Eaton Square which is in Belgravia one of the most historic residential parts of London, a short distance from Buckingham Palace and Knightsbridge.

Cleaning a Marble Tiled Floor

There were a lot of scratches in the Marble floor and it was also looking dull, so we set about first by giving it a good clean using Tile Doctor Pro-Clean which is an strong alkaline product designed for use on stone floors. It’s important to clean the floor before polishing to ensure there’s no dirt or grit on the floor which might get ground into the floor during polishing making the problem worse.

Marble Floor Polishing in Belgravia Marble Floor Polishing in Belgravia

Polishing Marble Tiles

Once the floor was clean we started the polishing process with a Red Burnishing pad fitted to a rotary machine, the pads are diamond encrusted and can remove deep scratches. We went over the floor carefully covering every tile four times and then followed up with the white, yellow and then green polishing pads, each one polishes the floor to a higher degree. The next step was to apply Tile Doctor Shine crystallising powder with a little water polished in with our polishing machine fitted with a natural fibre pad; this step gives the floor a tough durable finish. The floor was then thoroughly rinsed to remove any residues left on the floor all before giving it a final re-polish to bring out a deep high shine.

Marble Floor Polishing in Belgravia Marble Floor Polishing in Belgravia


Cleaning and Polishing a Marble Floor in Belgravia

Polishing a scratched Marble Floor in Eaton Square, Belgravia, London Read More »

╳
Scroll to Top